


一、任务执行和调度(Task Execution and Scheduling)
1、介绍
Spring框架使用TaskExecutor和TaskScheduler接口分别为异步执行和任务调度提供抽象。 Spring还提供了那些接口的实现,这些接口在应用服务器环境中支持线程池或委托给CommonJ。 最终,在公共接口背后使用这些实现抽象出了Java SE 5、Java SE 6和Java EE环境之间的差异。
Spring还提供集成类,用于支持使用计时器(JDK since 1.3的一部分)和Quartz调度器(http://quartz-scheer.org)进行调度。这两个调度器都是使用FactoryBean设置的,分别带有对计时器或触发器实例的可选引用。 此外,Quartz调度器和计时器都有一个方便的类,允许您调用现有目标对象的方法(类似于常规的MethodInvokingFactoryBean操作)。
2、 Spring TaskExecutor抽象
executor是线程池概念的JDK名称。“executor”命名是由于无法保证底层实现实际上是一个池;执行程序可以是单线程的,甚至是同步的。Spring的抽象隐藏了Java SE和Java EE环境之间的实现细节。
Spring的TaskExecutor接口等同于java.util.concurrent.Executor接口。实际上,最初它存在的主要原因是在使用线程池时抽象掉了对Java 5的需求。接口有一个方法execute(Runnable task),该方法接受一个基于线程池的语义和配置执行的任务。
最初创建TaskExecutor是为了在需要时为其他Spring组件提供线程池抽象。诸如ApplicationEventMulticaster、JMS的AbstractMessageListenerContainer和Quartz integration等组件都使用TaskExecutor池线程抽象。但是,如果您的bean需要线程池行为,则可以根据自己的需要使用此抽象。
2.1 TaskExecutor类型
Spring发行版中包含了许多预先构建的TaskExecutor实现。在任何情况下,您都不应该需要实现自己的。常见的开箱即用的变体是:
-
SyncTaskExecutor
此实现不异步执行调用。相反,每次调用都在调用线程中进行。它主要用于不需要多线程的情况下,比如在简单的测试用例中。
-
SimpleAsyncTaskExecutor
此实现不重用任何线程,而是为每次调用启动一个新线程。但是,它支持一个并发限制,该限制将阻塞任何超过该限制的调用,直到释放一个槽为止。如果您正在寻找真正的池,请参见下面的ThreadPoolTaskExecutor。
-
ConcurrentTaskExecutor
这个实现是java.util.concurrent.Executor的适配器实例。还有一种替代方法,ThreadPoolTaskExecutor,它将Executor配置参数公开为bean属性。很少需要直接使用ConcurrentTaskExecutor,但是如果ThreadPoolTaskExecutor不够灵活,不能满足您的需求,那么ConcurrentTaskExecutor是另一种选择。
-
ThreadPoolTaskExecutor
这个实现是最常用的。它公开了用于配置java.util.concurrent的bean属性。ThreadPoolExecutor并将其包装在一个TaskExecutor中。如果您需要适应另一种java.util.concurrent.Executor,建议使用ConcurrentTaskExecutor。
-
WorkManagerTaskExecutor
这个实现使用CommonJ WorkManager作为它的支持服务提供者,它是在Spring应用程序上下文中设置基于CommonJ的WebLogic/WebSphere线程池集成的中心便利类。
-
DefaultManagedTaskExecutor
此实现在JSR-236兼容的运行时环境(如Java EE 7+应用服务器)中使用jndi获得的ManagedExecutorService,以取代CommonJ WorkManager。
2.2 使用TaskExecutor
Spring的TaskExecutor实现用作简单的javabean。在下面的示例中,我们定义了一个bean,它使用ThreadPoolTaskExecutor异步打印一组消息。
①新建一个Runnable实现
-
/** -
* @author chenzx -
* @date 2018-10-22 上午 10:03 -
*/ -
@Data -
@Component -
public class MessagePrintExample { -
@Data -
private class MessagePrintTask implements Runnable { -
private String message; -
public MessagePrintTask(String message) { -
this.message = message; -
} -
@Override -
public void run() { -
System.out.println(Thread.currentThread().getName() + ": " + message); -
} -
} -
@Autowired -
private TaskExecutor taskExecutor; -
public MessagePrintExample() { -
} -
public void printMessage() { -
for (int i = 0; i < 25; i++) { -
taskExecutor.execute(new MessagePrintTask("Message" + i)); -
} -
} -
}
②配置文件
-
@Configuration -
@ComponentScan -
@ImportResource(locations = "classpath:spring/applicationContext-task.xml") -
public class TaskConfig { -
}
引入的spring/applicationContext-task.xml文件
-
<bean id="executor" class="org.springframework.scheduling.concurrent.ThreadPoolTaskExecutor"> -
<property name="corePoolSize" value="5"/> -
<property name="maxPoolSize" value="10"/> -
<property name="queueCapacity" value="25"/> -
</bean>
③测试:
-
@RunWith(SpringJUnit4ClassRunner.class) -
@ContextConfiguration(classes = TaskConfig.class) -
public class ExecutorTaskTest { -
@Autowired -
MessagePrintExample example; -
@Test -
public void testExecutorTask() { -
example.printMessage(); -
} -
}
结果:
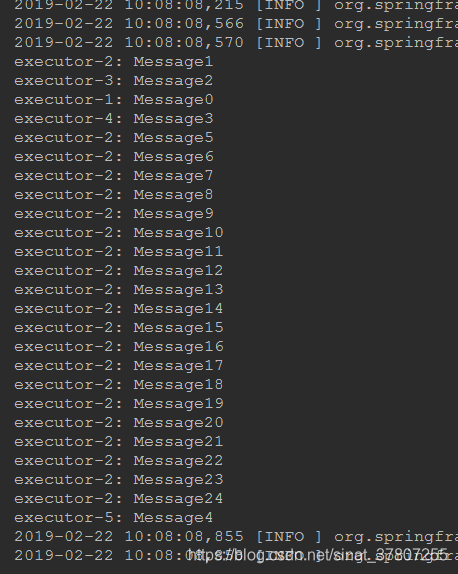
正如您所看到的,与从池中检索线程并执行自己不同,您将Runnable添加到队列中,TaskExecutor使用其内部规则来决定任务何时执行。
为了配置TaskExecutor将使用的规则,已经公开了简单的bean属性。
3、 Spring TaskScheduler抽象
除了TaskExecutor抽象之外,Spring 3.0还引入了一个任务调度程序,它提供了多种方法来调度将来某个时间点要运行的任务。
-
public interface TaskScheduler { -
ScheduledFuture schedule(Runnable task, Trigger trigger); -
ScheduledFuture schedule(Runnable task, Date startTime); -
ScheduledFuture scheduleAtFixedRate(Runnable task, Date startTime, long period); -
ScheduledFuture scheduleAtFixedRate(Runnable task, long period); -
ScheduledFuture scheduleWithFixedDelay(Runnable task, Date startTime, long delay); -
ScheduledFuture scheduleWithFixedDelay(Runnable task, long delay); -
}
最简单的方法是只接受Runnable和Date参数的“schedule”方法,这将导致任务在指定的时间之后运行一次。所有其他方法都能够调度任务以重复运行。固定速率和固定延迟方法用于简单的周期性执行,但是接受触发器的方法要灵活得多。
3.1 Trigger 接口
触发器接口本质上是受到Spring 3.0 JSR-236的启发,当时,JSR-236还没有正式实现。触发器的基本思想是,执行时间可以根据过去的执行结果甚至任意条件确定。如果这些决定确实考虑了前面执行的结果,则TriggerContext中可以使用这些信息。触发器接口本身非常简单:
-
public interface Trigger { -
Date nextExecutionTime(TriggerContext triggerContext); -
}
如您所见,TriggerContext是最重要的部分。它封装了所有相关的数据,如果需要,将来可以对其进行扩展。TriggerContext是一个接口(默认情况下使用SimpleTriggerContext实现)。在这里,您可以看到哪些方法可用于触发器实现。
-
public interface TriggerContext { -
Date lastScheduledExecutionTime(); -
Date lastActualExecutionTime(); -
Date lastCompletionTime(); -
}
3.2 Trigger实现
Spring提供了触发器接口的两种实现。最有趣的是CronTrigger。它支持基于cron表达式的任务调度。例如,下面的任务计划在每个小时过去15分钟运行,但只在工作日的朝九晚五“工作时间”运行。
scheduler.schedule(task, new CronTrigger("0 15 9-17 * * MON-FRI"));另一个现成的实现是接受一个固定周期、一个可选的初始延迟值,以及一个布尔值,指示该周期应该被解释为固定速率还是固定延迟的PeriodiTrigger。由于TaskScheduler接口已经定义了以固定速率或固定延迟调度任务的方法,因此只要可能,应该直接使用这些方法。PeriodicTrigger实现的价值在于,它可以在依赖于触发器抽象的组件中使用。 例如,可以方便地交替使用周期性触发器、基于cron的触发器,甚至自定义触发器实现。这样的组件可以利用依赖注入,以便在外部配置这样的触发器,从而很容易修改或扩展。
3.3 TaskScheduler 实现
与Spring的TaskExecutor抽象一样,TaskScheduler安排的主要好处是应用程序的调度需求与部署环境解耦。当部署到应用程序服务器环境时,此抽象级别尤其重要,在该环境中,应用程序本身不应该直接创建线程。对于这样的场景, Spring提供了一个TimerManagerTaskScheduler委托给WebLogic/WebSphere上的CommonJ TimerManager,以及一个最近的DefaultManagedTaskScheduler委托给Java EE 7+环境中的JSR-236 ManagedScheduledExecutorService,两者通常都使用JNDI查找配置。
当不需要外部线程管理时,一个更简单的替代方法是在应用程序中设置一个本地ScheduledExecutorService,可以通过Spring的ConcurrentTaskScheduler进行调整。为了方便起见,Spring还提供了一个ThreadPoolTaskScheduler,它在内部委托给ScheduledExecutorService,提供与ThreadPoolTaskExecutor类似的常见bean样式的配置。这些变量对于在宽松的应用程序服务器环境中(特别是在Tomcat和Jetty上)本地嵌入的线程池设置也非常适用。
示例:
①创建一个Service
com.segi.spring.task.scheduled.common.MySchedulerService
-
@Service -
public class MySchedulerService{ -
private SimpleDateFormat format = new SimpleDateFormat("yyyy-MM-dd HH:mm:ss"); -
@Autowired -
private TaskScheduler scheduler; -
public void doSchedulerTask() { -
scheduler.schedule(() -> System.out.println(Thread.currentThread().getName() + ": " + format.format(new Date())), -
new CronTrigger("*/1 * * * * ?")); -
} -
}
②配置文件
com.segi.spring.task.scheduled.SchedulerConfig
-
@Configuration -
@ComponentScan -
public class SchedulerConfig{ -
@Bean -
public TaskScheduler taskScheduler() { -
ThreadPoolTaskScheduler taskScheduler = new ThreadPoolTaskScheduler(); -
taskScheduler.setPoolSize(5); -
taskScheduler.initialize(); -
return taskScheduler; -
} -
}
③测试
com.segi.spring.task.scheduled.test.ScheduledTest
-
public class ScheduledTest { -
//还是得在main方法里才有效啊,启动spring容器就有效,在Junit的@Test方法里没有效果。 -
public static void main(String[] args) { -
ApplicationContext context = new AnnotationConfigApplicationContext(SchedulerConfig.class); -
MySchedulerService mySchedulerService = context.getBean(MySchedulerService.class); -
mySchedulerService.doSchedulerTask(); -
} -
}
结果:

4、Scheduling and Asynchronous Execution的注解支持
Spring为任务调度和异步方法执行提供注释支持。
4.1 EnableScheduling
要启用对@Scheduled和@Async注释的支持,请将@EnableScheduling和@EnableAsync添加到您的@Configuration类中:
-
@Configuration -
@EnableAsync -
@EnableScheduling -
public class AppConfig { -
}
您可以自由选择应用程序的相关注释。例如,如果您只需要对@Scheduled的支持,只需省略@EnableAsync即可。对于更细粒度的控制,您可以另外实现SchedulingConfigurer和/或AsyncConfigurer接口。有关详细信息,请参见javadoc。
如果您喜欢XML配置,可以使用<task:annotation-driven>元素。
-
<task:annotation-driven executor="myExecutor" scheduler="myScheduler"/> -
<task:executor id="myExecutor" pool-size="5"/> -
<task:scheduler id="myScheduler" pool-size="10"/>
注意:
1、在上面的XML中,提供了一个executor引用来处理那些与@Async注释的方法对应的任务,并提供了 scheduler 引用来管理那些用@Scheduled注释的方法。
2、 处理@Async注释的默认通知模式是“代理”,它只允许通过代理拦截调用;同一类中的本地调用不能以这种方式被拦截。对于更高级的拦截模式,可以考虑结合编译时或加载时编织切换到“aspectj”模式。
4.2@Scheduled注解
可以将@Scheduled注释与Trigger元数据一起添加到方法中。例如,下面的方法将以固定的延迟每5秒调用一次,这意味着周期将从前一次调用的完成时间开始度量。
-
@Scheduled(fixedDelay=5000)public void doSomething() { -
// something that should execute periodically -
}
如果需要固定速率的执行,只需更改注释中指定的属性名。在每次调用的连续启动时间之间,每5秒执行以下操作。
-
@Scheduled(fixedRate=5000)public void doSomething() { -
// something that should execute periodically -
}
对于固定延迟和固定速率任务,可以指定初始延迟,指示在第一次执行方法之前要等待的毫秒数。
-
@Scheduled(initialDelay=1000, fixedRate=5000)public void doSomething() { -
// something that should execute periodically -
}
如果简单的周期调度没有足够的表达能力,那么可以提供cron表达式。例如,以下命令只在工作日执行。
-
@Scheduled(cron="*/5 * * * * MON-FRI")public void doSomething() { -
// something that should execute on weekdays only -
}
注:您还可以使用zone属性指定解析cron表达式的时区。
注意,要调度的方法必须有void返回,并且不能期望有任何参数。如果方法需要与应用程序上下文中的其他对象交互,那么这些对象通常是通过依赖注入提供的。
示例:
①创建Service
com.segi.spring.task.scheduled.annotation.SchedulerAnnotationService
-
@Component -
public class SchedulerAnnotationService { -
private SimpleDateFormat format = new SimpleDateFormat("yyyy-MM-dd HH:mm:ss"); -
@Scheduled(fixedDelay = 5000) -
public void doSchedulerTadkWithFixedDelay() { -
System.out.println(Thread.currentThread().getName() + ": " + format.format(new Date())); -
} -
}
②Java配置
com.segi.spring.task.scheduled.SchedulerConfig
-
@Configuration -
@ComponentScan -
@EnableScheduling -
public class SchedulerConfig{ -
@Bean -
public TaskScheduler taskScheduler() { -
ThreadPoolTaskScheduler taskScheduler = new ThreadPoolTaskScheduler(); -
taskScheduler.setPoolSize(5); -
taskScheduler.initialize(); -
return taskScheduler; -
} -
}
③测试
-
public class ScheduledTest { -
public static void main(String[] args) { -
ApplicationContext context = new AnnotationConfigApplicationContext(SchedulerConfig.class); -
MySchedulerService mySchedulerService = context.getBean(MySchedulerService.class); -
mySchedulerService.doSchedulerTask(); -
} -
}
结果:

从Spring Framework 4.3开始,任何Scope的bean都支持@Scheduled方法。确保您没有在运行时初始化同一个被@Scheduled注释的类的多个实例,除非您确实希望调度对每个此类实例的回调。 与此相关的是,请确保您不会在使用@Scheduled进行注释并在容器中注册为常规Spring bean的bean类上使用@ configurationon: 否则,您将获得两次初始化,一次通过容器,一次通过@ configurationaspect,每次@Scheduled方法都会被调用两次。
4.3 @Async注解
可以在方法上提供@Async注解,该方法的调用将异步进行。换句话说,调用者将在调用时立即返回,方法的实际执行将发生在提交给Spring TaskExecutor的任务中。在最简单的情况下,注释可以应用于一个返回值为void的方法。
-
@Async -
void doSomething() { -
// this will be executed asynchronously -
}
示例:
①Java配置文件:
com.segi.spring.task.executor.annotation.AnnotationConfig
-
@Configuration -
@ComponentScan -
@ImportResource(locations = "classpath:spring/applicationContext-task.xml") -
public class AnnotationConfig { -
}
引入的spring/applicationContext-task.xml文件
-
<bean id="executor" class="org.springframework.scheduling.concurrent.ThreadPoolTaskExecutor"> -
<property name="corePoolSize" value="5"/> -
<property name="maxPoolSize" value="10"/> -
<property name="queueCapacity" value="25"/> -
</bean>
②com.segi.spring.task.executor.annotation.AnnotationAsyncExample
-
@Component -
public class AnnotationAsyncExample { -
@Async -
public void voidParamVoidReturn() { -
System.out.println("hello, " + Thread.currentThread().getName()); -
} -
}
③测试
-
@RunWith(SpringJUnit4ClassRunner.class) -
@ContextConfiguration(classes = AnnotationConfig.class) -
public class AnnotationAsyncTest { -
@Autowired -
AnnotationAsyncExampleannotationAsyncExample; -
@Test -
public void testVoidParamVoidReturn() { -
for (int i = 0; i < 25; i++) { -
annotationAsyncExample.voidParamVoidReturn(); -
} -
} -
}
结果:

注:
①如果容器中没有ThreadPoolTaskExecutor实例,调用的是主线程:
Java配置文件:
-
@Configuration -
@ComponentScan -
//@ImportResource(locations = "classpath:spring/applicationContext-task.xml") -
public class AnnotationConfig { -
}
结果:

②如果没有用@Async,调用的也是主线程
-
@Component -
public class AnnotationAsyncExample { -
//@Async -
public void voidParamVoidReturn() { -
System.out.println("hello, " + Thread.currentThread().getName()); -
} -
}
结果:

与用@Scheduled注释的方法不同,这些方法可以使用参数,因为调用者将在运行时以“正常”方式调用它们,而不是从容器管理的调度任务中调用它们。例如,下面是@Async注释的一个合法应用程序。
-
@Async -
void doSomething(String s) { -
// this will be executed asynchronously -
}
示例:
-
@Component -
public class AnnotationAsyncExample { -
@Async -
public void withParamVoidReturn(String msg) { -
System.out.println(msg + " " + Thread.currentThread().getName()); -
} -
}
测试:
-
@Component -
public class AnnotationAsyncExample { -
@Async -
public void withParamVoidReturn(String msg) { -
System.out.println(msg + " " + Thread.currentThread().getName()); -
} -
}
结果:

甚至返回值的方法也可以异步调用。但是,这些方法需要具有Future类型的返回值。这仍然提供了异步执行的好处,以便调用者可以调用Future的get()方法之前执行其他任务。
-
@Async -
Future<String> returnSomething(int i) { -
// this will be executed asynchronously -
}
注: @Async方法不仅可以声明一个普通的java.util.concurrent.Future,也可以是Spring的org.springframework.util.concurrent.ListenableFuture,或者Spring 4.2版本时,JDK 8的java.util.concurrent.CompletableFuture:用于与异步任务进行更丰富的交互,以及与进一步处理步骤进行即时组合。
实例:
-
@Component -
public class AnnotationAsyncExample { -
@Async -
public Future<String> withParamWithReturn(String msg) throws Exception { -
Callable<String> callable = () -> msg + " " + Thread.currentThread().getName(); -
FutureTask<String> futureTask = new FutureTask<>(callable); -
new Thread(futureTask).start(); -
return futureTask; -
} -
}
测试:
-
@RunWith(SpringJUnit4ClassRunner.class) -
@ContextConfiguration(classes = AnnotationConfig.class) -
public class AnnotationAsyncTest { -
@Autowired -
AnnotationAsyncExample annotationAsyncExample; -
@Test -
public void testWithParamWithReturn() throws Exception { -
for (int i = 0; i < 25; i++) { -
Future<String> future = annotationAsyncExample.withParamWithReturn("msg" + i); -
System.out.println(future.get()); -
} -
} -
}

注:如果不是返回Future类型,返回结果为null:

@Async不能与@PostConstruct这样的生命周期回调一起使用。要异步初始化Spring bean,目前必须使用一个单独的初始化Spring bean,该bean将在目标上调用带@Async注释的方法。
-
public class SampleBeanImpl implements SampleBean { -
@Async -
void doSomething() { -
// ... -
} -
} -
public class SampleBeanInitializer { -
private final SampleBean bean; -
public SampleBeanInitializer(SampleBean bean) { -
this.bean = bean; -
} -
@PostConstruct -
public void initialize() { -
bean.doSomething(); -
} -
}
注: @Async没有直接对应的XML,因为应该首先为异步执行设计这样的方法,而不是在外部重新声明为async。但是,您可以使用Spring AOP结合自定义切入点手动设置Spring的AsyncExecutionInterceptor。
4.4 @Async执行器选择
默认情况下,在方法上指定@Async时,将使用的执行器是上面描述的提供给“ annotation-driven”元素的执行器。但是,当需要指示在执行给定方法时应该使用默认值之外的执行器时,可以使用@Async注释的value属性。
-
@Async("otherExecutor")void doSomething(String s) { -
// this will be executed asynchronously by "otherExecutor" -
}
在本例中,“otherExecutor”可以是Spring容器中任何执行器 bean的名称,也可以是与任何Executor关联的限定符的名称,例如,由<qualifier>元素或Spring的@Qualifier注释指定。
示例:
-
@Component -
public class AnnotationAsyncExample { -
@Async("executor-two") -
public void executeWithMultiExecutor() { -
System.out.println("hello, " + Thread.currentThread().getName()); -
} -
}
测试:
-
@RunWith(SpringJUnit4ClassRunner.class) -
@ContextConfiguration(classes = AnnotationConfig.class) -
public class AnnotationAsyncTest { -
@Autowired -
AnnotationAsyncExample annotationAsyncExample; -
@Test -
public void testExecuteWithMultiExecutor() { -
for (int i = 0; i < 25; i++) { -
annotationAsyncExample.executeWithMultiExecutor(); -
} -
} -
}
结果:

4.5 @Async的异常管理
当@Async方法具有Future类型的返回值时,很容易管理方法执行期间抛出的异常,因为在对Future结果调用get()方法时将抛出此异常。然而,对于void返回类型,异常是未捕获的,不能传输。对于这些情况,可以提供AsyncUncaughtExceptionHandler来处理此类异常。
-
public class MyAsyncUncaughtExceptionHandler implements AsyncUncaughtExceptionHandler { -
@Override -
public void handleUncaughtException(Throwable ex, Method method, Object... params) { -
// handle exception -
} -
}
可以通过AsyncConfigurer或task:annotation-driven XML元素定义自定义AsyncUncaughtExceptionHandler。
示例:
①XML配置方式
AsyncUncaughtExceptionHandler
-
public class MyAsyncUncaughtExceptionHandler implements AsyncUncaughtExceptionHandler { -
@Override -
public void handleUncaughtException(Throwable throwable, Method method, Object... params) { -
System.out.println("msg:" + throwable.getMessage()); -
System.out.println("mehtod:" + method.getName()); -
System.out.println("params:" + Arrays.asList(params)); -
} -
}
XML配置:
-
<bean id="myAsyncUncaughtExceptionHandler" class="com.segi.spring.task.executor.exception.MyAsyncUncaughtExceptionHandler"/> -
<task:annotation-driven executor="executor" exception-handler="myAsyncUncaughtExceptionHandler"/>
抛出异常的异步方法:
-
@Async -
public void voidParamVoidReturn() { -
System.out.println("hello, " + Thread.currentThread().getName()); -
int i = 1 / 0; -
}
测试:
-
@Test -
public void testVoidParamVoidReturn() { -
for (int i = 0; i < 25; i++) { -
annotationAsyncExample.voidParamVoidReturn(); -
} -
}
结果:

②AsyncConfigurer
javaConfig
-
@Configuration -
@ComponentScan -
@EnableAsync -
public class AnnotationConfig implements AsyncConfigurer { -
@Override -
public Executor getAsyncExecutor() { -
ThreadPoolTaskExecutor executor = new ThreadPoolTaskExecutor(); -
executor.setCorePoolSize(10); -
executor.setMaxPoolSize(25); -
executor.setQueueCapacity(20); -
executor.initialize(); -
return executor; -
} -
@Override -
public AsyncUncaughtExceptionHandler getAsyncUncaughtExceptionHandler() { -
return new MyAsyncUncaughtExceptionHandler(); -
} -
}
抛异常的方法
-
@Async -
public void voidParamVoidReturn() { -
System.out.println("hello, " + Thread.currentThread().getName()); -
int i = 1 / 0; -
}
测试
-
@Test -
public void testVoidParamVoidReturn() { -
for (int i = 0; i < 25; i++) { -
annotationAsyncExample.voidParamVoidReturn(); -
} -
}
结果:

5、Task 命名空间
从Spring 3.0开始,有一个用于配置TaskExecutor和TaskScheduler实例的XML命名空间。它还提供了一种便利的方法来配置要用触发器调度的任务。
5.1 'scheduler' 元素
下面的元素将创建具有指定线程池大小的ThreadPoolTaskScheduler实例。
<task:scheduler id="scheduler" pool-size="10"/>为'id'属性提供的值将用作池中线程名称的前缀。“scheduler”元素相对简单。如果不提供“池大小”属性,默认线程池将只有一个线程。调度程序没有其他配置选项。
5.2 'executor' 元素
下面将创建一个ThreadPoolTaskExecutor实例:
<task:executor id="executor" pool-size="10"/>与上面的调度程序一样,为'id'属性提供的值将用作池中线程名称的前缀(@Async("executorName"),否则使用)。就池大小而言,“executor”元素比“scheduler”元素支持更多的配置选项。首先,ThreadPoolTaskExecutor的线程池本身更具可配置性。执行程序的线程池可能具有不同的核心值和最大大小,而不是单一大小。如果只提供一个值,那么执行器将拥有一个固定大小的线程池(核心大小和最大大小相同)。 但是,“executor”元素的“池大小”属性也接受“min-max”形式的范围。
-
<task:executor -
id="executorWithPoolSizeRange" -
pool-size="5-25" -
queue-capacity="100"/>
使用前缀名称:
-
@Async("executor") -
public void voidParamVoidReturn() { -
System.out.println("hello, " + Thread.currentThread().getName()); -
}
测试:
-
@Test -
public void testVoidParamVoidReturn() { -
for (int i = 0; i < 25; i++) { -
annotationAsyncExample.voidParamVoidReturn(); -
} -
}
结果:

不标注名称:
-
@Async -
public void voidParamVoidReturn() { -
System.out.println("hello, " + Thread.currentThread().getName()); -
}
结果:

从配置中可以看到,还提供了一个“ queue-capacity”值。还应该根据执行器的queue-capacity考虑线程池的配置。有 pool size和 queue capacity之间关系的完整描述,请参阅ThreadPoolExecutor的文档。其主要思想是,当提交任务时,如果当前活跃线程的数量小于 core size,执行器将首先尝试使用空闲线程。如果已经达到 core size,那么只要队列的容量未满,任务就会被添加到队列中。 只有在达到queue-capacity时,执行器才会创建一个超出core size的新线程。如果已达到 max size,则执行程序将拒绝该任务。
默认情况下,队列是无限的,但这不是理想的配置,因为如果在所有池线程繁忙时向队列添加了足够的任务,就会导致outofmemoryerror错误。此外,如果队列是无限的,那么max size根本不起作用。因为执行器将总是在线程数超出core size时,将新建的线程加入队列。一个队列必须是有限的(这就是为什么一个固定大小的池是唯一使用一个无限队列的场景)。
稍后,我们将回顾keep-alive设置的效果,该设置在提供池大小配置时添加了另一个要考虑的因素。 首先,让我们考虑一下上面提到的拒绝任务的情况。默认情况下,当任务被拒绝时,线程池执行器将抛出TaskRejectedException异常。 然而,拒绝策略实际上是可配置的。在使用默认拒绝策略(即AbortPolicy实现)时引发异常。 对于在重载下可以跳过某些任务的应用程序,可以配置DiscardPolicy或 DiscardOldestPolicy 。 对于需要在重载下限制提交任务的应用程序,另一个很好的选项是CallerRunsPolicy。 该策略将强制调用submit方法的线程运行任务本身,而不是抛出异常或丢弃任务。其思想是这样一个调用者在运行该任务时很忙,不能立即提交其他任务。因此,它提供了一种简单的方法来控制传入负载,同时保持线程池和队列的限制。通常,这允许执行程序“缠住”它正在处理的任务,从而释放队列、池或两者中的一些容量。这些选项中的任何一个都可以从“executor”元素上的“ rejection-policy”属性的枚举值中选择。
-
<task:executor -
id="executorWithCallerRunsPolicy" -
pool-size="5-25" -
queue-capacity="100" -
rejection-policy="CALLER_RUNS"/>
最后,keep-alive设置确定线程在终止之前保持空闲的时间限制(以秒为单位)。如果当前池中的线程数超过核心线程数,那么在等待这段时间而不处理任务之后,多余的线程将被终止。时间值为零将导致执行任务后立即终止多余的线程,而不会在任务队列中保留后续工作。
-
<task:executor -
id="executorWithKeepAlive" -
pool-size="5-25" -
keep-alive="120"/>
5.3 'scheduled-tasks' 元素
Spring任务名称空间最强大的功能是支持在Spring应用程序上下文中配置要调度的任务。 这遵循了与Spring中其他“方法调用器”类似的方法,例如JMS名称空间提供的用于配置消息驱动pojo的方法。 基本上,“ref”属性可以指向任何spring管理对象,而“method”属性提供要在该对象上调用的方法的名称。下面是一个简单的例子。
-
<task:scheduled-tasks scheduler="myScheduler"> -
<task:scheduled ref="beanA" method="methodA" fixed-delay="5000"/> -
</task:scheduled-tasks> -
<task:scheduler id="myScheduler" pool-size="10"/>
可以看到,调度程序由外部元素引用,每个单独的任务都包含其触发器元数据的配置。在前面的示例中,该元数据定义了一个具有固定延迟的周期触发器,该延迟指示在每个任务执行完成后等待的毫秒数。另一个选项是“固定利率”,表示无论之前执行多长时间,都应该多久执行一次方法。 此外,对于固定延迟和固定速率任务,可以指定一个“初始延迟”参数,指示方法第一次执行之前等待的毫秒数。为了获得更多的控制,可以提供一个“cron”属性。下面是演示这些其他选项的示例。
-
<task:scheduled-tasks scheduler="myScheduler"> -
<task:scheduled ref="beanA" method="methodA" fixed-delay="5000" initial-delay="1000"/> -
<task:scheduled ref="beanB" method="methodB" fixed-rate="5000"/> -
<task:scheduled ref="beanC" method="methodC" cron="*/5 * * * * MON-FRI"/> -
</task:scheduled-tasks> -
<task:scheduler id="myScheduler" pool-size="10"/>
示例:
pojo
-
@Service -
public class XmlConfigSchedulerService { -
public void doScheduledTask() { -
System.out.println(Thread.currentThread().getName() + ":执行"); -
} -
}
配置:
-
@Configuration -
@ComponentScan -
@ImportResource(locations = "classpath:spring/applicationContext-task.xml") -
public class SchedulerConfig/* implements AsyncConfigurer */{ -
}
-
<?xml version="1.0" encoding="UTF-8"?> -
<beans xmlns="http://www.springframework.org/schema/beans" -
xmlns:task="http://www.springframework.org/schema/task" -
xmlns:xsi="http://www.w3.org/2001/XMLSchema-instance" -
xsi:schemaLocation="http://www.springframework.org/schema/beans -
http://www.springframework.org/schema/beans/spring-beans.xsd -
http://www.springframework.org/schema/task -
http://www.springframework.org/schema/task/spring-task.xsd"> -
<task:annotation-driven executor="executor" exception-handler="myAsyncUncaughtExceptionHandler"/>--> -
<!--pool-size:没有指定为单线程--> -
<task:scheduler id="scheduler" pool-size="10"/> -
<task:scheduled-tasks scheduler="scheduler"> -
<task:scheduled ref="xmlConfigSchedulerService" method="doScheduledTask" fixed-delay="1000"/> -
</task:scheduled-tasks> -
</beans>
测试:
-
public static void main(String[] args) { -
ApplicationContext context = new AnnotationConfigApplicationContext(SchedulerConfig.class); -
}
结果:


 1万+
1万+


 被折叠的 条评论
为什么被折叠?
被折叠的 条评论
为什么被折叠?
 到【灌水乐园】发言


