


当你的应用程序需要向用户呈现重要信息,或提示用户重要选择时,可以使用警告框(Alert View)和操作表(Action Sheet)。下图左侧部分是警告框,右侧部分是操作表。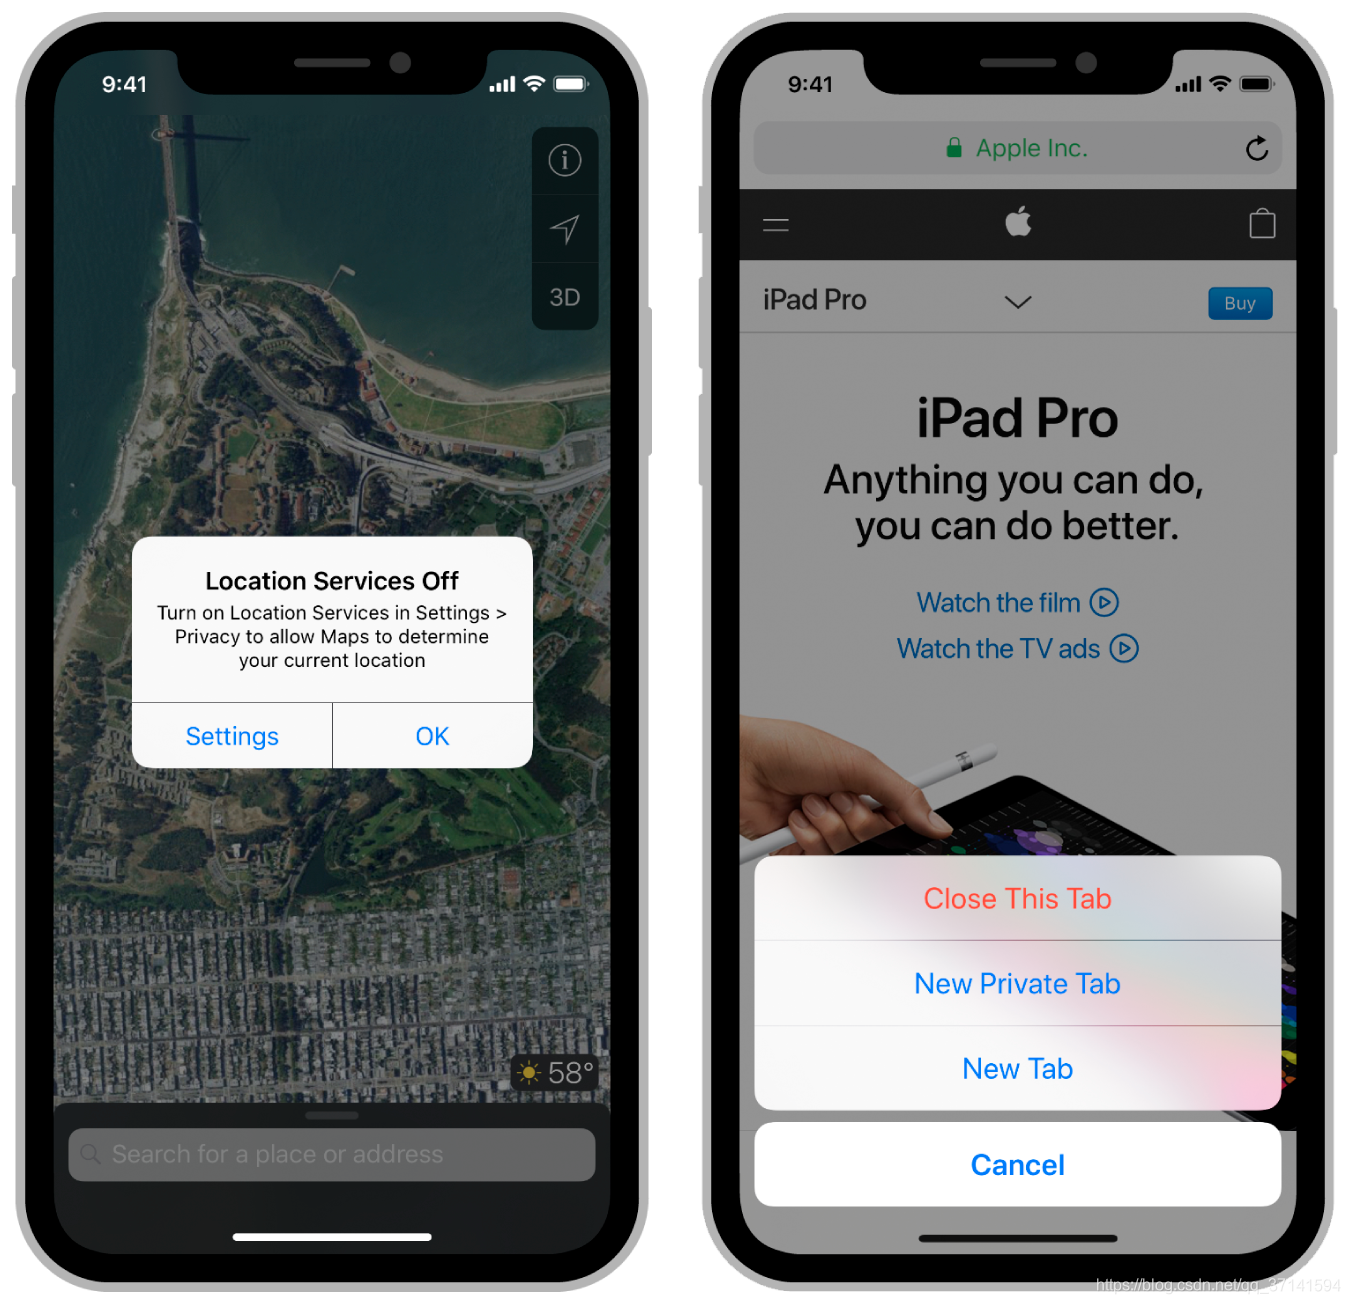
自iOS 8开始,Apple用继承自UIViewController的UIAlertController取代了UIAlertView和UIAlertSheet。
警报控制器(UIAlertController)虽然有警告框和操作表两种形式,但其创建步骤是一样的。如下所示:
- 创建
UIAlertController,指定警报控制器样式。 - 向警报控制器添加按钮。
- 显示
UIAlertController。
1. 创建demo
下面通过demo来学习一下。
打开Xcode,点击File > New > Project…,选择iOS > Application > Single View Application模板,点击Next;在Product Name中填写AlertController,点击Next;选择文件,点击Create创建工程。
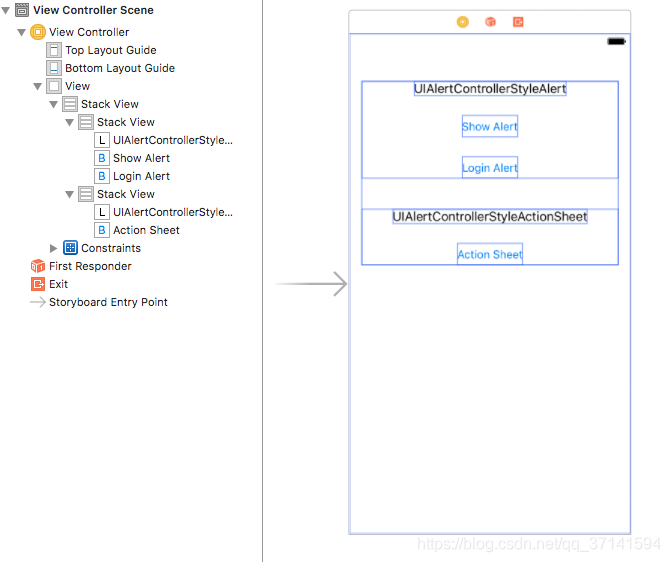
打开刚创建工程的storyboard,在storyboard中自上而下依次添加以下控件,内容为UIAlertControllerStyleAlert的UILabel,名称为Show Alert的UIButton,名称为Login Alert的UIButton,内容为UIAlertControllerStyleActionSheet的UILabel,名称为Action Sheet的UIButton。如下图:
把UIButton拖拽到ViewController.m的接口部分,类型为IBAction。完成后代码如下:
#import "ViewController.h"

@interface ViewController ()

- (IBAction)showAlertView:(UIButton *)sender;
- (IBAction)showLoginAlertView:(UIButton *)sender;
- (IBAction)showActionSheet:(UIButton *)sender;

@end
2. 简单对话框样式
2.1 创建警报控制器
创建UIAlertController非常简单,不需要设置代理、不需要指定按钮。
下面先在showAlertView:方法中,创建UIAlertController。
- (IBAction)showAlertView:(UIButton *)sender
{
    // 1.创建UIAlertController
    UIAlertController *alertController = [UIAlertController alertControllerWithTitle:@"Alert Title"
                                                                             message:@"The message is ..."
                                                                      preferredStyle:UIAlertControllerStyleAlert];
}
这里的preferredStyle:参数有UIAlertControllerStyleAlert和UIAlertControllerStyleActionSheet两种,这里我们要创建的是Alert View,所以使用第一种。
2.2 添加按钮
使用actionWithTitle: style: handler:方法创建UIAlertAction对象,之后把对象添加到警报控制器。
UIAlertAction对象由标题、样式和用户单击该按钮时运行的代码块三部分组成。UIAlertActionStyle有三种样式,样式一UIAlertActionStyleCancel,用于取消操作、不作任何修改,就是常见的取消按钮;样式二UIAlertActionStyleDefault,按钮的默认样式;第三种是UIAlertActionStyleDestructive,用于对数据进行更改或删除的操作,这种样式的按钮标题会自动使用红色显示。
在showAlertView:方法中添加Cancel按钮和OK按钮。
- (IBAction)showAlertView:(UIButton *)sender
{
    ...
    // 2.创建并添加按钮
    UIAlertAction *okAction = [UIAlertAction actionWithTitle:@"OK" style:UIAlertActionStyleDefault handler:^(UIAlertAction * _Nonnull action) {
        NSLog(@"OK Action");
    }];
    UIAlertAction *cancelAction = [UIAlertAction actionWithTitle:@"Cancel" style:UIAlertActionStyleCancel handler:^(UIAlertAction * _Nonnull action) {
        NSLog(@"Cancel Action");
    }];

    [alertController addAction:okAction];           // A
    [alertController addAction:cancelAction];       // B
}
2.3 显示UIAlertController
显示UIAlertController。
- (IBAction)showAlertView:(UIButton *)sender
{
    ...
    // 3.呈现UIAlertContorller
    [self presentViewController:alertController animated:YES completion:nil];
}
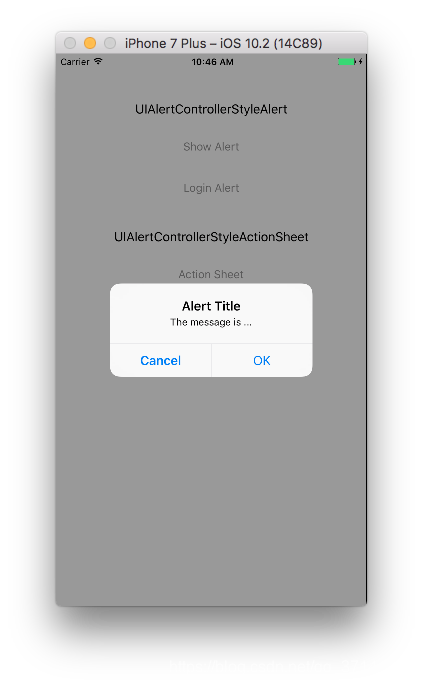
点击Show Alert按钮,视图控制器显示如下:
改变上面addAction:方法顺序,运行app,你会发现Alert View中按钮顺序不变。当Alert View样式中有Cancel按钮时,Cancel按钮总是显示在左侧,与添加按钮的顺序无关。
在showAlertView:方法中再添加一个UIAlertActionStyleDestructive样式的Reset按钮。
- (IBAction)showAlertView:(UIButton *)sender
{
    ...
    UIAlertAction *resetAction = [UIAlertAction actionWithTitle:@"Reset" style:UIAlertActionStyleDestructive handler:^(UIAlertAction * _Nonnull action) {
        NSLog(@"Reset Action");
    }];
    [alertController addAction:resetAction];        // C
    [alertController addAction:okAction];           // A
    [alertController addAction:cancelAction];       // B
    ...
}
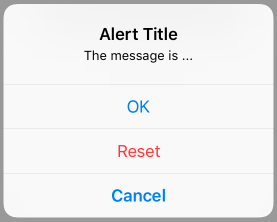
运行demo,显示如下:

当Alert View中存在一个或两个按钮时,按钮会水平排布;按钮大于两个时会像Action Sheet那样竖列展示。把上面addAction:方法顺序改变为B、A、C,运行app,视图控制器显示如下:
可以看到只要上面有UIAlertActionStyleCancel样式的按钮,该按钮总是在最底部,其他按钮顺序由添加顺序决定。如果包含UIAlertActionStyleDestructive样式的按钮,一般先添加,以便在第一个位置显示。每一个警报控制器只能包含一个Cancel按钮,如果你添加了两个或多个,在运行时会抛出NSInternalInconsistencyException的异常。
3. 登录文本框
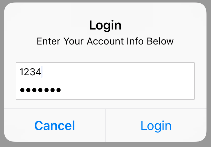
UIAlerController的另一个用途是我们可以向警报控制器中添加任意数量的UITextField作为警报控制器内容视图中的一部分。比如常见的登陆框。
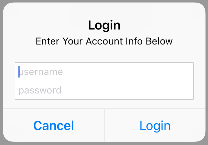
为创建一个如上图的登录框,我们需要为警报控制器添加两个文本框。每一个文本框添加合适的占位符以提示需要输入文本信息类型,并为需要输入密码的文本框启用安全文本,以确保密码安全。更新后的showLoginAlertView:代码如下:
- (IBAction)showLoginAlertView:(UIButton *)sender
{
    // 1.创建UIAlertController
    UIAlertController *alertController = [UIAlertController alertControllerWithTitle:@"Login"
                                                                             message:@"Enter Your Account Info Below"
                                                                      preferredStyle:UIAlertControllerStyleAlert];

    // 2.1 添加文本框
    [alertController addTextFieldWithConfigurationHandler:^(UITextField * _Nonnull textField) {
        textField.placeholder = @"username";
    }];
    [alertController addTextFieldWithConfigurationHandler:^(UITextField * _Nonnull textField) {
        textField.placeholder = @"password";
        textField.secureTextEntry = YES;
    }];
}
继续在showLoginAlertView:方法中添加Cancel按钮和Login按钮,在点击Login按钮时获取文本框中的账号和密码并输出到控制台。
- (IBAction)showLoginAlertView:(UIButton *)sender
{
    ...
    // 2.2  创建Cancel Login按钮
    UIAlertAction *cancelAction = [UIAlertAction actionWithTitle:@"Cancel" style:UIAlertActionStyleCancel handler:^(UIAlertAction * _Nonnull action) {
        NSLog(@"Cancel Action");
    }];
    UIAlertAction *loginAction = [UIAlertAction actionWithTitle:@"Login" style:UIAlertActionStyleDefault handler:^(UIAlertAction * _Nonnull action) {
        UITextField *userName = alertController.textFields.firstObject;
        UITextField *password = alertController.textFields.lastObject;

        // 输出用户名 密码到控制台
        NSLog(@"username is %@, password is %@",userName.text,password.text);
    }];
}
上面的代码中,UIAlertController内textFields 数组内元素顺序和添加顺序一致。
最后添加按钮,显示警报控制器。
- (IBAction)showLoginAlertView:(UIButton *)sender
{
    ...
    // 2.3 添加按钮
    [alertController addAction:cancelAction];
    [alertController addAction:loginAction];

    // 3.显示警报控制器
    [self presentViewController:alertController animated:YES completion:nil];
}
现在运行app,在第一个文本框中输入pro648,在第二个文本框内输入x,点击Login按钮,控制台输出如下:
username is pro648, password is x
在实际应用中我们一般会对用户名和密码长度进行限制,当长度不足时应该禁用Login按钮。我们可以通过为文本框添加一个UIControllEventEditingChanged响应事件来实现。记得在添加按钮前先禁用按钮。更新后代码如下:
- (IBAction)showLoginAlertView:(UIButton *)sender
{
    ...
    // 2.1 添加文本框
    [alertController addTextFieldWithConfigurationHandler:^(UITextField * _Nonnull textField) {
        textField.placeholder = @"username";

        [textField addTarget:self action:@selector(alertUserAccountInfoDidChange:) forControlEvents:UIControlEventEditingChanged];     // 添加响应事件
    }];
    [alertController addTextFieldWithConfigurationHandler:^(UITextField * _Nonnull textField) {
        textField.placeholder = @"password";
        textField.secureTextEntry = YES;

        [textField addTarget:self action:@selector(alertUserAccountInfoDidChange:) forControlEvents:UIControlEventEditingChanged];     // 添加响应事件
    }];

    ...
    // 2.3 添加按钮
    loginAction.enabled = NO;   // 禁用Login按钮
    [alertController addAction:cancelAction];
    [alertController addAction:loginAction];
    ...
}

- (void)alertUserAccountInfoDidChange:(UITextField *)sender
{
    UIAlertController *alertController = (UIAlertController *)self.presentedViewController;

    if (alertController)
    {
        NSString *userName = alertController.textFields.firstObject.text;
        NSString *password = alertController.textFields.lastObject.text;
        UIAlertAction *loginAction = alertController.actions.lastObject;

        if (userName.length > 3 && password.length > 6)
            // 用户名大于3位,密码大于6位时,启用Login按钮。
            loginAction.enabled = YES;
        else
            // 用户名小于等于3位,密码小于等于6位,禁用Login按钮。
            loginAction.enabled = NO;
    }
}
UIAlertController中的textFields和actions均是数组类型,添加的第一个对象index为0。之后按照添加的顺序index依次加1,虽然前面说到Cancel按钮一般显示在左侧(横排)或底部(竖排),但并不代表它在数组中的位置是第一个或最后一个,其index是由添加的顺序决定。你可以根据username字符串长度来禁用Login按钮进行测试。
现在只有在用户名大于三位、密码大于六位时,Login按钮才可以点击。
4. 操作表Action Sheet
操作表一般用于为用户提供一组可供选择的操作选项,如删除、恢复等。一般根据设备尺寸大小决定呈现形式,在iPhone上,操作表由底部滑出;在iPad上,操作表以弹出框(popover)形式出现。
创建操作表的方法与警告框类似,唯一不同在于preferredStyle:参数的选择。在showActionSheet:方法中创建操作表。
- (IBAction)showActionSheet:(UIButton *)sender
{
    // 1.创建UIAlertController
    UIAlertController *alertController = [UIAlertController alertControllerWithTitle:@"Action Sheet"
                                                                             message:@"Deleted data can't be restored"
                                                                      preferredStyle:UIAlertControllerStyleActionSheet];
}
下面创建并添加按钮,最后呈现警报控制器。
- (IBAction)showActionSheet:(UIButton *)sender
{
    ...
    // 2.1 创建按钮
    UIAlertAction *deleteAction = [UIAlertAction actionWithTitle:@"Delete" style:UIAlertActionStyleDestructive handler:^(UIAlertAction * _Nonnull action) {
        NSLog(@"Delete Action");
    }];
    UIAlertAction *cancelAction = [UIAlertAction actionWithTitle:@"Cancel" style:UIAlertActionStyleCancel handler:^(UIAlertAction * _Nonnull action) {
        NSLog(@"Cancel Action");
    }];

    // 2.2 添加按钮
    [alertController addAction:deleteAction];
    [alertController addAction:cancelAction];

    // 3.显示警报控制器
    [self presentViewController:alertController animated:YES completion:nil];
}
运行app,操作表展示如下:
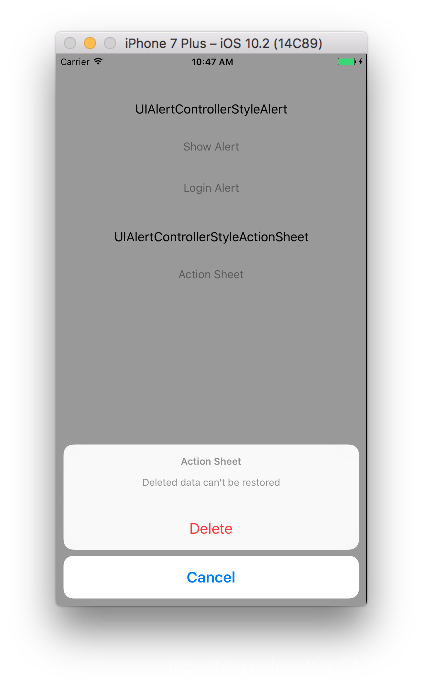
如果Action Sheet中有取消按钮,取消按钮每次都会在底部显示,其他按钮会按照添加的顺序显示。在Action Sheet内不能添加文本框。如果你添加了文本框,在运行时会抛出下面的异常提醒:
*** Terminating app due to uncaught exception ‘NSInternalInconsistencyException’, reason: ‘Text fields can only be added to an alert controller of style UIAlertControllerStyleAlert’
如上面说到的,在iPad中Action Sheet以弹出框的形式呈现。弹出框总是需要一个锚点,锚点可以是源视图,也可以是按钮。在这个demo中,我们用按钮触发弹出框,所以这里将把按钮作为锚点。showActionSheet:方法更新后如下:
- (IBAction)showActionSheet:(UIButton *)sender
{
    ...
    UIPopoverPresentationController *popover = alertController.popoverPresentationController;
    if (popover)
    {
        popover.sourceView = sender;
        popover.sourceRect = sender.bounds;
        popover.permittedArrowDirections = UIPopoverArrowDirectionAny;
    }

    // 3.显示警报控制器
    [self presentViewController:alertController animated:YES completion:nil];
}
如果在iPad中没有添加上面方法,运行时会出现下面崩溃提示:
*** Terminating app due to uncaught exception ‘NSGenericException’, reason: ‘Your application has presented a UIAlertController (<UIAlertController: 0x7f88c85221f0>) of style UIAlertControllerStyleActionSheet. The modalPresentationStyle of a UIAlertController with this style is UIModalPresentationPopover. You must provide location information for this popover through the alert controller’s popoverPresentationController. You must provide either a sourceView and sourceRect or a barButtonItem. If this information is not known when you present the alert controller, you may provide it in the UIPopoverPresentationControllerDelegate method -prepareForPopoverPresentation.’
现在,Action Sheet以触发它的按钮为锚点,以弹出框形式展现。
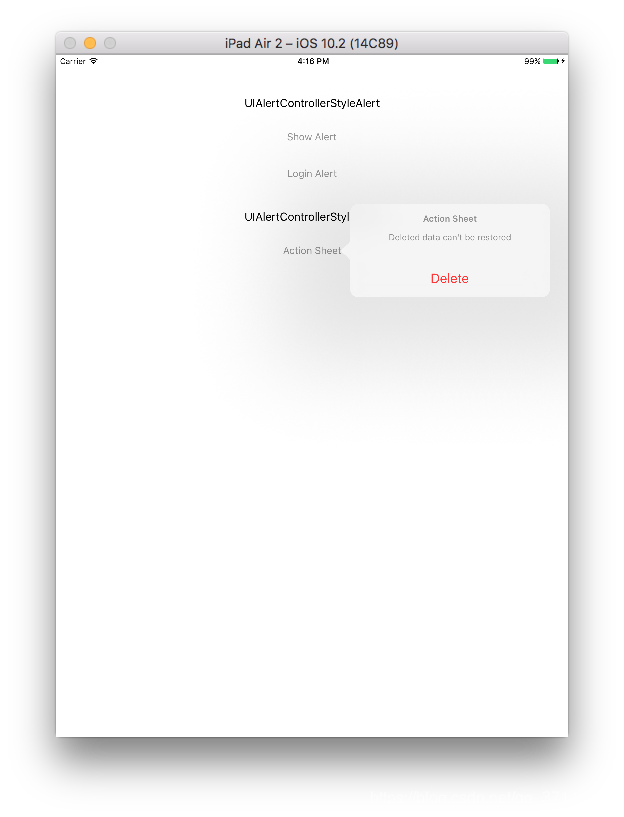
当Action Sheet以弹出框形式展现时,
UIKit会取消显示Cancel按钮。此时,点击popover以外任何区域和点击Cancel按钮效果一致,同时会调用取消按钮的完成处理程序。
5. 退出警报控制器
警报控制器会在用户点击按钮后自动消失,但在app进入后台时,警告框和选择表并不会自动退出。此时,我们需要通过代码实现退出警报控制器。
在通知中心进行注册,当接收到app进入后台的通知时退出警报控制器。更新后的viewDidLoad如下:
- (void)viewDidLoad
{
    [super viewDidLoad];

    // app 进入后台后隐藏警报控制器
    [[NSNotificationCenter defaultCenter] addObserverForName:UIApplicationDidEnterBackgroundNotification object:nil queue:nil usingBlock:^(NSNotification * _Nonnull note) {
        [self.presentedViewController dismissViewControllerAnimated:YES completion:nil];
    }];
}

- (void)dealloc
{
    // 移除观察者
    [[NSNotificationCenter defaultCenter] removeObserver:self name:UIApplicationDidEnterBackgroundNotification object:nil];
}
最后一定记得移除观察者,否则会引起崩溃。
总结
下面总结下Alert View和Action Sheet的异同。
警告框Alert View:
- 一般显示在当前视图控制器的中心,点击警告框以外区域不能隐藏警告控制器。
- 可以添加任意数量文本框。
- 有一个或两个按钮时,横向排布,如果有Cancel按钮,则Cancel按钮显示在左侧;有两个以上按钮时,竖列排布,如果有Cancel按钮,则Cancel按钮显示在最底部。其他按钮按照添加顺序排布。
操作表Action Sheet:
- 在iPhone中自下而上滑出显示在当前控制器的底部,点击action sheet以外区域可以隐藏
UIAlertController。 - 在iPad中以popover方式、以源视图为锚点显示,点击选择表以外的区域可以隐藏警告控制器。
- 不能添加文本框。
- 按钮竖列排布,在iPhone中,Cancel按钮默认在底部显示;在iPad中,Cancel按钮默认不显示。
UIAlertController类只能原样使用,不支持子类化。该类的视图层次结构是私有的,不能修改。最后,需要注意的是,警告框和操作表向用户显示信息时会中断应用的当前流程,请只在需要的时候使用,切勿滥用。
Demo名称:AlertController
源码地址:https://github.com/pro648/BasicDemos-iOS
参考资料:
欢迎更多指正:https://github.com/pro648/tips/wiki
本文地址:https://github.com/pro648/tips/wiki/UIAlertController的使用


 269
269


 被折叠的 条评论
为什么被折叠?
被折叠的 条评论
为什么被折叠?
 到【灌水乐园】发言


