

Android五大布局详解——TableLayout(表格布局)
TableLayout
前面所学的LinearLayout和RelativeLayout两大布局已经完全适用于各种开发条件下,其他的布局仅供参考学习,毕竟知识就是力量,以后的开发过程中万一遇到也能游刃有余。
表格布局允许我们使用表格的方式来排列组件,就是行与列的方式。
简单描述
1.直接往TableLayout中添加组件,这个组件占满一行。
<?xml version="1.0" encoding="utf-8"?>
<TableLayout xmlns:android="http://schemas.android.com/apk/res/android"
    android:layout_width="match_parent"
    android:layout_height="match_parent"
    >

    <Button
        android:id="@+id/button"
        android:layout_width="wrap_content"
        android:layout_height="wrap_content"
        android:text="TableLayout"
        />

</TableLayout>
效果如图:

2.如果想要一行上有多个组件,就要添加一个TableRow的容器。
<?xml version="1.0" encoding="utf-8"?>
<TableLayout xmlns:android="http://schemas.android.com/apk/res/android"
    android:layout_width="match_parent"
    android:layout_height="match_parent"
    >

    <TableRow>

        <Button
            android:id="@+id/button_1"
            android:layout_width="wrap_content"
            android:layout_height="wrap_content"
            android:text="1"
            />

        <Button
            android:id="@+id/button_2"
            android:layout_width="wrap_content"
            android:layout_height="wrap_content"
            android:text="2"
            />

        <Button
            android:id="@+id/button_3"
            android:layout_width="wrap_content"
            android:layout_height="wrap_content"
            android:text="3"
            />

        <Button
            android:id="@+id/button_4"
            android:layout_width="wrap_content"
            android:layout_height="wrap_content"
            android:text="4"
            />

    </TableRow>

</TableLayout>
效果如图:
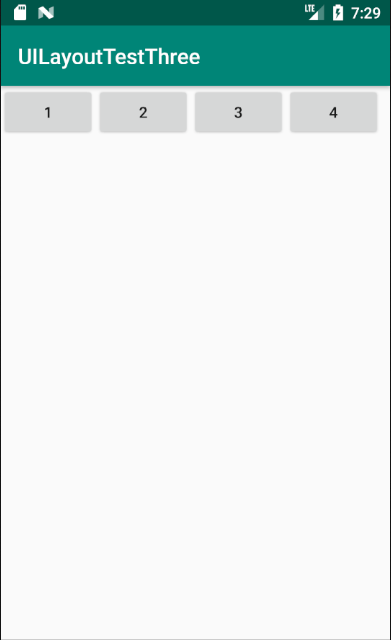
3.tablerow中的组件个数就决定了该行有多少列。
常用属性
1.android:collapseColumns:设置需要被隐藏的列的序号。比如android:collapseColumns="0,2",隐藏第一列和第三列。
<?xml version="1.0" encoding="utf-8"?>
<TableLayout xmlns:android="http://schemas.android.com/apk/res/android"
    android:layout_width="match_parent"
    android:layout_height="match_parent"
    android:collapseColumns="0,2"
    >

    <TableRow>

        <Button
            android:id="@+id/button_1"
            android:layout_width="wrap_content"
            android:layout_height="wrap_content"
            android:text="1"
            />

        <Button
            android:id="@+id/button_2"
            android:layout_width="wrap_content"
            android:layout_height="wrap_content"
            android:text="2"
            />

        <Button
            android:id="@+id/button_3"
            android:layout_width="wrap_content"
            android:layout_height="wrap_content"
            android:text="3"
            />

        <Button
            android:id="@+id/button_4"
            android:layout_width="wrap_content"
            android:layout_height="wrap_content"
            android:text="4"
            />

        <Button
            android:id="@+id/button_5"
            android:layout_width="wrap_content"
            android:layout_height="wrap_content"
            android:text="5"
            />

        <Button
            android:id="@+id/button_6"
            android:layout_width="wrap_content"
            android:layout_height="wrap_content"
            android:text="6"
            />

    </TableRow>

</TableLayout>
效果如图:

2.android:stretchColumns:设置允许被拉伸的列的列序号。比如android:stretchColumns="1",设置第二列可拉伸列,让该列填满这一行所有的剩余空间。
<?xml version="1.0" encoding="utf-8"?>
<TableLayout xmlns:android="http://schemas.android.com/apk/res/android"
    android:layout_width="match_parent"
    android:layout_height="match_parent"
    android:stretchColumns="1"
    >

    <TableRow>

        <Button
            android:id="@+id/button_1"
            android:layout_width="wrap_content"
            android:layout_height="wrap_content"
            android:text="1"
            />

        <Button
            android:id="@+id/button_2"
            android:layout_width="wrap_content"
            android:layout_height="wrap_content"
            android:text="2"
            />

        <Button
            android:id="@+id/button_3"
            android:layout_width="wrap_content"
            android:layout_height="wrap_content"
            android:text="3"
            />

    </TableRow>

</TableLayout>
效果如图:

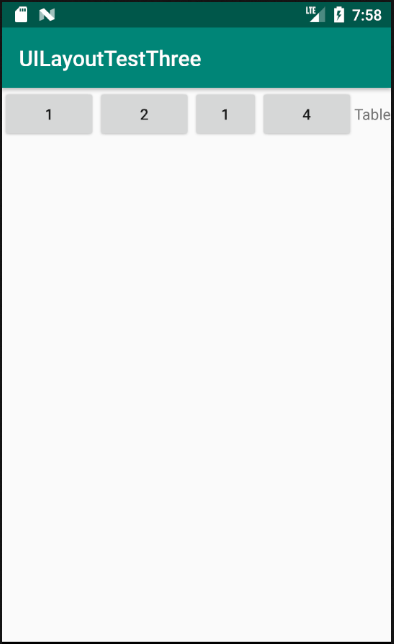
3.android:shrinkColumns:设置允许被收缩的列的列序号
<?xml version="1.0" encoding="utf-8"?>
<TableLayout xmlns:android="http://schemas.android.com/apk/res/android"
    android:layout_width="match_parent"
    android:layout_height="match_parent"
    android:shrinkColumns="2"
    >

    <TableRow>

        <Button
            android:id="@+id/button_1"
            android:layout_width="wrap_content"
            android:layout_height="wrap_content"
            android:text="1"
            />

        <Button
            android:id="@+id/button_2"
            android:layout_width="wrap_content"
            android:layout_height="wrap_content"
            android:text="2"
            />

        <Button
            android:id="@+id/button_3"
            android:layout_width="wrap_content"
            android:layout_height="wrap_content"
            android:text="1"
            />

        <Button
            android:id="@+id/button_4"
            android:layout_width="wrap_content"
            android:layout_height="wrap_content"
            android:text="4"
            />

        <TextView
            android:layout_width="wrap_content"
            android:layout_height="wrap_content"
            android:text="Table" />

    </TableRow>

</TableLayout>
运行结果如图:
demo
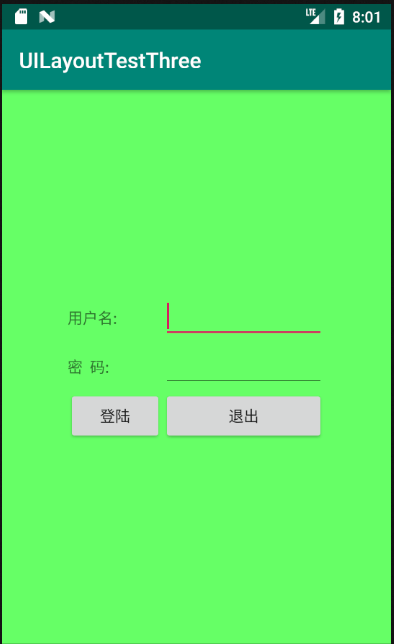
实现如图所示的界面
<?xml version="1.0" encoding="utf-8"?>
<TableLayout xmlns:android="http://schemas.android.com/apk/res/android"
    xmlns:tools="http://schemas.android.com/tools"
    android:id="@+id/TableLayout1"
    android:layout_width="match_parent"
    android:layout_height="match_parent"
    tools:context=".MainActivity"
    android:stretchColumns="0,3"
    android:gravity="center_vertical"
    android:background="#66FF66"
    >

    <TableRow>
        <TextView />
        <TextView
            android:layout_width="wrap_content"
            android:layout_height="wrap_content"
            android:text="用户名:"/>
        <EditText
            android:layout_width="wrap_content"
            android:layout_height="wrap_content"
            android:minWidth="150dp"/>
        <TextView />
    </TableRow>

    <TableRow>
        <TextView />
        <TextView
            android:layout_width="wrap_content"
            android:layout_height="wrap_content"
            android:text="密  码:"
            />
        <EditText
            android:layout_width="wrap_content"
            android:layout_height="wrap_content"
            android:minWidth="150dp"
            />
        <TextView />
    </TableRow>

    <TableRow>
        <TextView />
        <Button
            android:layout_width="wrap_content"
            android:layout_height="wrap_content"
            android:text="登陆"/>
        <Button
            android:layout_width="wrap_content"
            android:layout_height="wrap_content"
            android:text="退出"/>
        <TextView />
    </TableRow>

</TableLayout>
分析:
调用gravity属性,设置为center_vertical,让布局里面的组件在竖直方向上居中;将TableLayout中的第一和第四列设置为可拉伸;在每个TableRow中添加两个TextView,用于拉伸填满该行,这样可以让表格水平居中,android:stretchColumns="0,3" 设置为0和3,是为了让两边都充满,那么中间部分就可以居中了。
