
TensorFlow 深度学习简介


到目前为止,我们一直使用 NumPy 构建神经网络。现在我将引导您了解一个深度学习框架,该框架将使您更轻松地构建神经网络。TensorFlow 等机器学习框架可以显着加快您的机器学习开发速度。这些框架有很多文档,您可以随意阅读。在本教程中,我将教授如何在 TensorFlow 中执行以下操作:
- 初始化变量;
- 开始您自己的会话。
编程框架不仅可以缩短我们的编码时间,而且有时还可以执行优化以加快我们的编码速度。
1 - 探索 TensorFlow 基础知识:
让我们从导入开始:
import os
os.environ['CUDA_VISIBLE_DEVICES'] = '-1'
import numpy as np
import tensorflow as tf
我们将从一个示例开始,我将为您计算一个训练示例的损失:
# Define y_hat constant. Set to 36.
y_hat = tf.constant(36, name='y_hat')
# Define y. Set to 39
y = tf.constant(39, name='y')

# Create a variable for the loss
loss = tf.Variable((y - y_hat)**2, name='loss')

# When init is run later (session.run(init)),
# the loss variable will be initialized and ready to be computed
init = tf.global_variables_initializer()

# Create a session and print the output
with tf.Session() as session:
	# Initializes the variables
    session.run(init)
    # Prints the loss
    print(session.run(loss))
输出:
9在 TensorFlow 中编写和运行程序有以下步骤:
1. 创建尚未执行/评估的张量(变量);
2. 这些张量之间的写操作;
3. 初始化你的张量;
4.创建会话;
5. 运行会话。这将运行您在上面编写的操作。
因此,当我们为损失创建变量时,我们将损失定义为其他数量的函数,但没有评估其值。为了评估它,我们必须运行init=tf.global_variables_initializer(). 这一行初始化了损失变量,在最后一行,我们终于能够评估损失的值并打印它的值。
现在让我们看一个简单的例子。运行下面的单元格:
a = tf.constant(5)
b = tf.constant(10)
c = tf.multiply(a,b)
print(c)
输出:
张量("Mul_4:0", shape=(), dtype=int32)正如预期的那样,你不会看到 50!你得到一个张量,说结果是一个没有形状属性和类型“int32”的张量。你所做的只是放在“计算图”中,但你还没有运行这个计算。要实际将这两个数字相乘,您必须创建一个会话并运行它:
sess = tf.Session()
print(sess.run(c))
输出:
50伟大的!总而言之,请记住初始化变量,创建会话并在会话内运行操作。
接下来,我们还必须了解占位符。占位符是一个对象,您只能在以后指定其值。要为占位符指定值,您可以使用“提要字典”(feed_dict 变量)传入值。下面,我为 x 创建了一个占位符。这允许我们稍后在运行会话时传入一个数字。
# Change the value of x in the feed_dict

x = tf.placeholder(tf.int64, name = 'x')
print(sess.run(2 * x, feed_dict = {x: 3}))
sess.close()
输出:
6当我们第一次定义 x 时, 我们不必为它指定一个值。占位符只是一个变量,您将在稍后运行会话时将数据分配给它。我们说您 在运行会话时将数据提供给这些占位符。
这是发生了什么:当您指定计算所需的操作时,您告诉 TensorFlow 如何构建计算图。计算图可以有一些占位符,您稍后将指定其值。最后,当您运行会话时,您是在告诉 TensorFlow 执行计算图。
1.1 - 线性函数:
让我们计算以下等式: Y = W X + b,其中 W 和 X 是随机矩阵,b是随机向量。
W 的形状为 (4, 3),X 为 (3,1),b 为 (4,1)。
def linear_function():
    # Initializes W to be a random tensor of shape (4,3)
    X = tf.constant(np.random.randn(3,1), name = "X")
    # Initializes X to be a random tensor of shape (3,1)
    W = tf.constant(np.random.randn(4,3), name = "W")
    # Initializes b to be a random tensor of shape (4,1)
    b = tf.constant(np.random.randn(4,1), name = "b")
    # Y = WX + b
    Y = tf.add(tf.matmul(W,X),b)

    # Create the session using tf.Session() and run it with sess.run(...) on the variable we want to calculate
    sess = tf.Session()
    result = sess.run(Y)

    # close the session
    sess.close()

    return result

print( "result = ",linear_function())
输出:
结果 = [[ 3.30652566]
 [0.43876476]
 [-3.14835357]
 [2.29081716]]
1.2 - 计算 sigmoid:
我们刚刚实现了一个线性函数。Tensorflow 提供了多种常用的神经网络函数,如 tf.sigmoid 和 tf.softmax。对于这个练习,让我们计算输入的 sigmoid 函数。
我们将使用占位符变量 x来做到这一点。运行会话时,我们应该使用 feed 字典来传递输入 z。所以,我们将不得不:
1. 创建一个占位符 x;
2. 使用 , 定义计算 sigmoid 所需的操作tf.sigmoid,然后;
3. 运行会话。
请注意,在 TensorFlow 中创建和使用会话有两种典型方法:
方法一:
sess = tf.Session()
# Run the variables initialization (if needed), run the operations
result = sess.run(..., feed_dict = {...})
sess.close() # Close the session
方法二:
with tf.Session() as sess:
    # run the variables initialization (if needed), run the operations
    result = sess.run(..., feed_dict = {...})
    # This takes care of closing the session for you :)
现在我们将使用第二种方法:
def sigmoid(z):
    # Create a placeholder for x. Name it 'x'.
    x = tf.placeholder(tf.float32, name = 'x')

    # compute sigmoid(x)
    sigmoid = tf.sigmoid(x)

    # Create a session, and run it.
    # We should use a feed_dict to pass z's value to x.
    with tf.Session() as sess:
        # Run session and call the output "result"
        result = sess.run(sigmoid, feed_dict = {x: z})

    return result

print("sigmoid(0) = " + str(sigmoid(0)))
print("sigmoid(12) = " + str(sigmoid(12)))
输出:
sigmoid(0) = 0.5
sigmoid(12) = 0.9999938
总而言之,现在我们知道如何:
1. 创建占位符;
2.指定要计算的操作对应的计算图;
3.创建会话;
4. 运行会话并使用提要字典指定占位符变量值。
1.3 - 计算成本:
我们还可以使用内置函数来计算神经网络的成本。 因此,对于i=1...m,不需要编写代码来将其计算为 a 和 y的函数:
我们可以在 TensorFlow 中用一行代码做到这一点!
我们将使用的函数是:tf.nn.sigmoid_cross_entropy_with_logits(logits = ..., labels = ...)
我们的代码应该输入 z,计算 sigmoid(得到 a),然后计算交叉熵成本J。所有这一切都可以通过调用 来完成 tf.nn.sigmoid_cross_entropy_with_logits,它计算上面给出的J 成本公式:
def cost(logits, labels):
    # Create the placeholders for "logits" (z) and "labels" (y)
    z = tf.placeholder(tf.float32, name = 'z')
    y = tf.placeholder(tf.float32, name = 'y')

    # Use the loss function
    cost = tf.nn.sigmoid_cross_entropy_with_logits(logits = z, labels = y)

    # Create a session (method 1 above)
    sess = tf.Session()

    # Run the session
    cost = sess.run(cost, feed_dict = {z: logits, y: labels})

    # Close the session (method 1 above)
    sess.close()

    return cost

logits = sigmoid(np.array([0.2,0.4,0.7,0.9]))
cost = cost(logits, np.array([0,0,1,1]))
print ("cost = ", cost)
输出:
cost = [1.0053872 1.0366408 0.41385433 0.39956617]
1.4 - 使用 One Hot 编码:
在深度学习中,我们将有一个y向量,其数字范围从 0 到 C-1,其中 C 是类的数量。例如,如果 C 是 4,那么您可能有以下 y 向量,您需要将其转换如下:
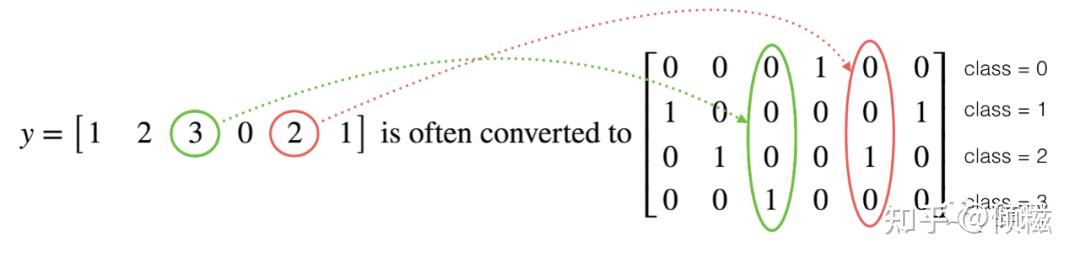

这被称为“one-hot”编码,因为在转换后的表示中,每列中恰好有一个元素是“hot”(意思是设置为 1)。要在 NumPy 中进行这种转换,您可能需要编写几行代码。在 TensorFlow 中,我们可以使用一行代码:
tf.one_hot(labels, depth, axis)
我们将实现下面的函数来获取一个标签向量和类的总数 并返回 one-hot 编码。
def one_hot_matrix(labels, C):

    # Create a tf.constant equal to C (depth), with name 'C'.
    C = tf.constant(C, name = "C")

    # Use tf.one_hot, be careful with the axis
    one_hot_matrix = tf.one_hot(labels, C, axis=0)

    # Create the session
    sess = tf.Session()

    # Run the session
    one_hot = sess.run(one_hot_matrix)

    # Close the session (method 1 above)
    sess.close()

    return one_hot

labels = np.array([1,2,3,0,2,1])
one_hot = one_hot_matrix(labels, C = 4)
print ("one_hot = ")
print (one_hot)
输出:
one_hot =
[[0. 0. 0. 1. 0. 0.]
 [1。0. 0. 0. 0. 1.]
 [0。1. 0. 0. 1. 0.]
 [0。0. 1. 0. 0. 0.]]
1.5 - 用零和一初始化:
现在我们将学习如何初始化一个由 0 和 1 组成的向量。我们将调用的函数是 tf.ones(). 要使用零初始化,我们可以tf.zeros()改用。这些函数形成并分别返回一个充满零和一的维度形状数组。
def ones(shape):
    # Create "ones" tensor using tf.ones(...).
    ones = tf.ones(shape)

    # Create the session
    sess = tf.Session()

    # Run the session to compute 'ones'
    ones = sess.run(ones)

    # Close the session (method 1 above)
    sess.close()

    return ones

print("ones = ")
print(ones((5,3)))
输出:
ones =
[[1. 1. 1.]
 [1. 1. 1.]
 [1. 1. 1.]
 [1. 1. 1.]
 [1. 1. 1.]]
结论:
在本教程之后您应该记住的内容:
1、Tensorflow是一个用于深度学习的编程框架;
2.TensorFlow中的两个主要对象类是Tensors和Operators;
3. 当你在 TensorFlow 中编码时,你必须采取以下步骤:
3.1. 创建一个包含张量(变量、占位符...)和操作(、、、... tf.matmul)的图tf.add;
3.2. 创建会话;
3.4. 初始化会话;
3.5 运行会话以执行图表。
最后,给大家整理了全套的人工智能学习资料包,需要的朋友关注公众号【辞门】,回复【资料】,免费领取