


Netty简单实现客户端与服务端收发消息
这个小案例主要是实现netty收发消息,分为客户端,及服务端,以及包含了相关状态处理,主要的代码会放在最后 gitHub 地址上,有需要可以看一下
首先来简单说明一下消息收发流程
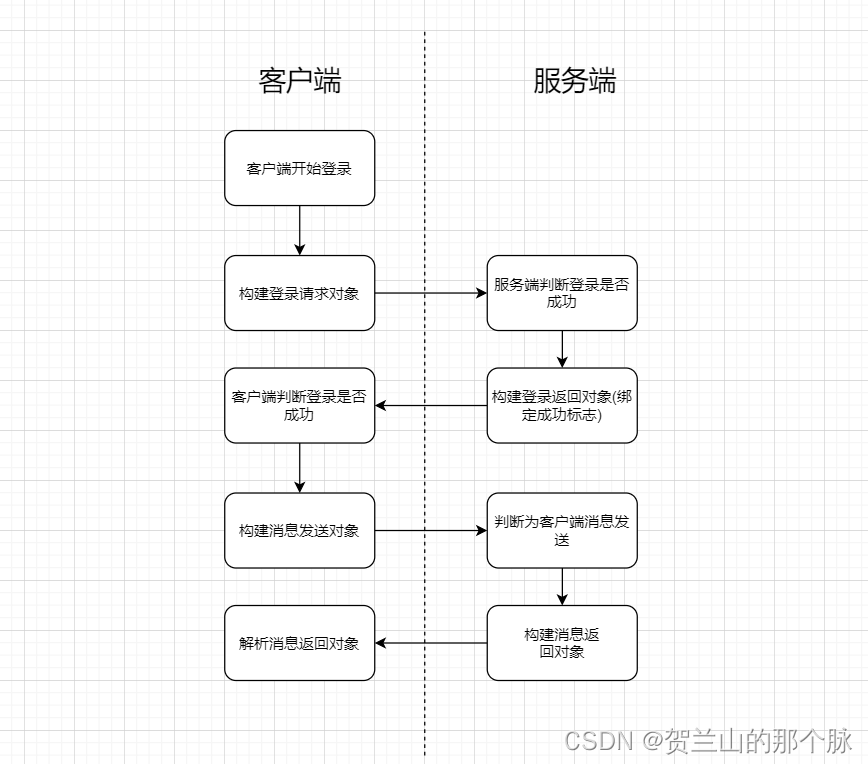
1.客户端构建登录请求对象,服务端判断登录是否成功,并绑定成功状态
2.客户端判断登录成功,构建消息请求对象接收消息
3.服务端接收消息后进行处理,并构建消息返回对象,进行返回
4.客户端接收消息返回对象处理,流程结束
一 创建消息对象及状态新增
收发消息对象
消息请求对象 :
@Data
public class MessageRequestPacket extends Packet {
    /**
     * 消息体
     */
    private String message;

    @Override
    public Byte getCommand() {
        return MESSAGE_REQUEST;
    }
}
消息返回对象 :
@Data
public class MessageResponsePacket extends Packet {
    /**
     * 消息体
     */
    private String message;

    @Override
    public Byte getCommand() {
        return MESSAGE_RESPONSE;
    }
}
指令新增 :
public interface Command {
    Byte LOGIN_REQUEST = 1;

    Byte LOGIN_RESPONSE = 2;

    Byte MESSAGE_REQUEST = 3;

    Byte MESSAGE_RESPONSE = 4;
}
解码处理 :
public class PacketCodeC {

    private static final int MAGIC_NUMBER = 0X12345678;

    public static final PacketCodeC INSTANCE = new PacketCodeC();

    private final Map<Byte,Class<? extends Packet>> packetTypeMap;
    private final Map<Byte,Serializer> serializerMap;

    public PacketCodeC() {
        packetTypeMap = new HashMap<>();
        packetTypeMap.put(LOGIN_REQUEST, LoginRequestPacket.class);
        packetTypeMap.put(LOGIN_RESPONSE, LoginResponsePacket.class);
        packetTypeMap.put(MESSAGE_REQUEST, MessageRequestPacket.class);
        packetTypeMap.put(MESSAGE_RESPONSE, MessageResponsePacket.class);

        serializerMap = new HashMap<>();
        JSONSerializer serializer = new JSONSerializer();
        serializerMap.put(serializer.getSerializerAlgorithm(),serializer);
    }

    /**
     * 编码
     * @param packet
     * @return
     */
    public ByteBuf encode(ByteBuf byteBuf,Packet packet) {

        byte[] bytes = Serializer.DEFAULT.serialize(packet);

        //魔数
        byteBuf.writeInt(MAGIC_NUMBER);
        //版本号
        byteBuf.writeByte(packet.getVersion());
        //序列化算法
        byteBuf.writeByte(Serializer.DEFAULT.getSerializerAlgorithm());
        //指令
        byteBuf.writeByte(packet.getCommand());
        //数据长度
        byteBuf.writeInt(bytes.length);
        //数据
        byteBuf.writeBytes(bytes);

        return byteBuf;
    }

    public Packet decode(ByteBuf byteBuf) {
        //跳过魔数
        byteBuf.skipBytes(4);
        //跳过版本号
        byteBuf.skipBytes(1);
        //序列化算法标识
        byte serializerAlgorithm = byteBuf.readByte();
        //指令
        byte command = byteBuf.readByte();
        //数据包长度
        int length = byteBuf.readInt();
        //数据
        byte[] bytes = new byte[length];
        byteBuf.readBytes(bytes);

        Class<? extends Packet> requestType = getRequestType(command);
        Serializer serializer = getSerializer(serializerAlgorithm);

        if (requestType != null && serializer != null){
            return serializer.deserialize(requestType,bytes);
        }

        return null;
    }

    private Serializer getSerializer(byte serializerAlgorithm) {
        return serializerMap.get(serializerAlgorithm);
    }

    private Class<? extends Packet> getRequestType(byte command) {
        return packetTypeMap.get(command);
    }
}
二 判断是否登录
1.登录成功标志位定义
public interface Attributes {
    AttributeKey<Boolean> LOGIN = AttributeKey.newInstance("login");
}
ClientHandler 登录成功状态处理
if (packet instanceof LoginRequestPacket) {
            LoginRequestPacket loginResponsePacket = (LoginRequestPacket) packet;

            if (loginResponsePacket.getSuccess().equals(Boolean.TRUE)) {
                LoginUtil.markAsLogin(ctx.channel());
                System.out.println(new Date() + ": 客户端登录成功");
            }else {
                System.out.println(new Date() + ": 客户端登录失败,失败原因 : " +
                        loginResponsePacket.getReason());
            }
        }
上面代码主要在于 LoginUtil.markAsLogin(ctx.channel());这部分 状态的修改
public class LoginUtil {

    public static void markAsLogin(Channel channel) {
        channel.attr(Attributes.LOGIN).set(Boolean.TRUE);
    }

    public static boolean hasLogin(Channel channel) {
        Attribute<Boolean> loginAttr = channel.attr(Attributes.LOGIN);
        return loginAttr.get() != null;
    }
}
三 客户端输入消息并发送
public class LoginClient {
    public static void main(String[] args) {
        //
        NioEventLoopGroup workerGroup = new NioEventLoopGroup();

        Bootstrap bootstrap = new Bootstrap();
        bootstrap.group(workerGroup)
                .channel(NioSocketChannel.class)
                .handler(new ChannelInitializer<SocketChannel>() {
                    @Override
                    protected void initChannel(SocketChannel sc) throws Exception {
                        sc.pipeline().addLast(new ClientHandler());
                    }
                });

        connect(bootstrap,"127.0.0.1",8000,null);
    }

    private static void connect(Bootstrap bootstrap,String host,Integer port,Integer retry) {
        bootstrap.connect(host,port).addListener(future -> {
            System.out.println("future状态 :" + future.isSuccess());
            if (future.isSuccess()) {
                Channel channel = ((ChannelFuture) future).channel();
                startConsoleThread(channel);
            }
        });
    }

    private static void startConsoleThread(Channel channel) {
        new Thread(() -> {
            while (!Thread.interrupted()) {
                System.out.println("channel状态 :" + channel);
                if (LoginUtil.hasLogin(channel)) {
                    System.out.println("输入消息发送至服务端 : ");
                    Scanner sc = new Scanner(System.in);
                    String line = sc.nextLine();

                    MessageRequestPacket packet = new MessageRequestPacket();
                    packet.setMessage(line);

                    ByteBuf byteBuf = PacketCodeC.INSTANCE.encode(channel.alloc().ioBuffer(), packet);
                    channel.writeAndFlush(byteBuf);
                }
            }
        }).start();
    }
}
四 服务端,客户端消息处理
服务端消息处理 :
if (packet instanceof MessageRequestPacket){
            MessageRequestPacket messageRequestPacket = (MessageRequestPacket) packet;
            System.out.println(new Date() + " : 收到客户端消息 : " + messageRequestPacket.getMessage());

            MessageResponsePacket responsePacket = new MessageResponsePacket();

            responsePacket.setMessage("服务端回复 : [ " + messageRequestPacket.getMessage() + " ] ");
            ByteBuf responseByteBuf = PacketCodeC.INSTANCE.encode(ctx.channel().alloc().ioBuffer(), responsePacket);
            ctx.channel().writeAndFlush(responseByteBuf);
        }
客户端消息处理 :
if (packet instanceof MessageResponsePacket) {
            MessageResponsePacket messageResponsePacket = (MessageResponsePacket) packet;
            System.out.println(new Date() + " : 收到服务端的消息 :" + messageResponsePacket.getMessage());
        }
总的来说流程也较为简单,并没有太复杂的处理,有什么问题的话,断点做下跟踪基本都能解决了
源码地址 : https://github.com/xiatiandao/Netty-IMServer/tree/master


 3053
3053


 被折叠的 条评论
为什么被折叠?
被折叠的 条评论
为什么被折叠?
 到【灌水乐园】发言


