

1.Junit test使用
1.导入maven依赖
<dependency>
      <groupId>junit</groupId>
      <artifactId>junit</artifactId>
      <version>4.12</version>
      <scope>test</scope>
</dependency>
过低版本如3.8.1版本不能用@标签
2.常用的注解
unit常用注解详细说明
Java注解((Annotation)的使用方法是@注解名 ,能通过简单的词语来实现一些功能。在junit中常用的注解有@Test、@Ignore、@BeforeClass、@AfterClass、@Before、@After、@Runwith、@Parameters
以下是相关的介绍和使用说明:
1).@Test
在junit3中,是通过对测试类和测试方法的命名来确定是否是测试,且所有的测试类必须继承junit的测试基类。
在junit4中,定义一个 测试方法变得简单很多,只需要在方法前加上@Test就行了。
注意:测试方法必须是public void,即公共、无返回数据。可以抛出异常。
2).@Ignore
有时候我们想暂时不运行某些测试方法\测试类,可以在方法前加此注解。在运行结果中,junit会统计忽略的用例数,来提醒你。
但是不建议经常这么做,因为这样的坏处时,容易忘记去更新这些测试方法,导致代码不够干净,用例遗漏。
3).@BeforeClass
当我们运行几个有关联的用例时,可能会在数据准备或其它前期准备中执行一些相同的命令,这个时候为了让代码更清晰,更少冗余,可以将公用的部分提取出来,放在一个方法里,并为这个方法注解@BeforeClass。意思是在测试类里所有用例运行之前,运行一次这个方法。例如创建数据库连接、读取文件等。
注意:方法名可以任意,但必须是public static void,即公开、静态、无返回。这个方法只会运行一次
4).@AfterClass
跟@BeforeClass对应,在测试类里所有用例运行之后,运行一次。用于处理一些测试后续工作,例如清理数据,恢复现场。
注意:同样必须是public static void,即公开、静态、无返回。这个方法只会运行一次。
5).@Before
与@BeforeClass的区别在于,@Before不止运行一次,它会在每个用例运行之前都运行一次。主要用于一些独立于用例之间的准备工作。比如两个用例都需要读取数据库里的用户A信息,但第一个用例会删除这个用户A,而第二个用例需要修改用户A。那么可以用@BeforeClass创建数据库连接。用@Before来插入一条用户A信息。
注意:必须是public void,不能为static。不止运行一次,根据用例数而定。
6).@After
与@Before对应。
7).@Runwith
首先要分清几个概念:测试方法、测试类、测试集、测试运行器。
其中测试方法就是用@Test注解的一些函数。测试类是包含一个或多个测试方法的一个**Test.java文件,测试集是一个suite,可能包含多个测试类。测试运行器则决定了用什么方式偏好去运行这些测试集/类/方法。
而@Runwith就是放在测试类名之前,用来确定这个类怎么运行的。也可以不标注,会使用默认运行器。
常见的运行器有:
1. @RunWith(Parameterized.class) 参数化运行器,配合@Parameters使用junit的参数化功能
2.@RunWith(Suite.class)
@SuiteClasses({ATest.class,BTest.class,CTest.class})
测试集运行器配合使用测试集功能
3.@RunWith(JUnit4.class)
junit4的默认运行器
4.@RunWith(JUnit38ClassRunner.class)
用于兼容junit3.8的运行器
5.一些其它运行器具备更多功能。例如@RunWith(SpringJUnit4ClassRunner.class)集成了spring的一些功能
8).@Parameters
用于使用参数化功能。
3.添加段言
assertEquals();
assertTrue();
需要import对应的类;
import static org.junit.Assert.assertTrue;
import static org.junit.Assert.assertEquals;
import static org.junit.Assert.*;
2018-06-08 11:00
4.利用junit4对springMVC所有层进行测试
package com.my.test;

import javax.annotation.Resource;

import org.junit.Assert;
import org.junit.Test;
import org.junit.runner.RunWith;
import org.springframework.test.context.ContextConfiguration;
import org.springframework.test.context.junit4.SpringJUnit4ClassRunner;
import org.springframework.transaction.annotation.Transactional;

import com.my.service.TradeService;

@RunWith(SpringJUnit4ClassRunner.class)//让测试运行于Spring环境
@ContextConfiguration({"classpath*:config/beans.xml","classpath*:/spring-mvc.xml"}) //引入Spring配置
public class TestJunit {
    @Resource
    private TradeService tradeService;

    @Test
    @Transactional
    public void testPagesNum() {
        Assert.assertEquals("Pages num is not 2!", tradeService.getPagesNum(10), 2);
    }

}

5.综合测试
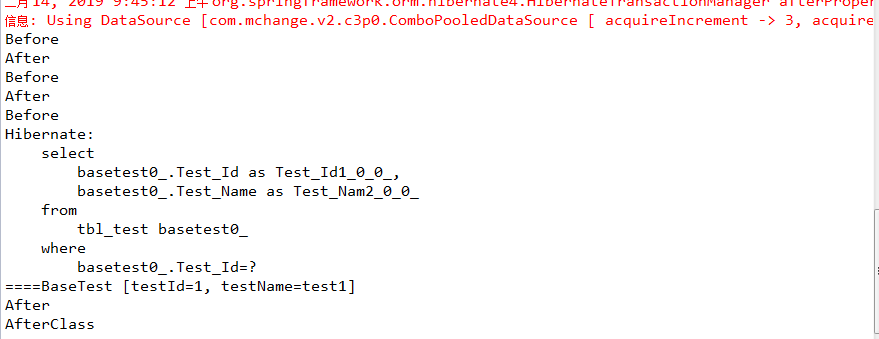
package com.my.test;

import javax.annotation.Resource;

import org.junit.After;
import org.junit.AfterClass;
import org.junit.Assert;
import org.junit.Before;
import org.junit.BeforeClass;
import org.junit.Test;
import org.junit.runner.RunWith;
import org.springframework.test.context.ContextConfiguration;
import org.springframework.test.context.junit4.SpringJUnit4ClassRunner;

import com.my.service.TestService;

@RunWith(SpringJUnit4ClassRunner.class) // 让测试运行于Spring环境
@ContextConfiguration({ "classpath*:config/beans.xml", "classpath*:/spring-mvc.xml" }) // 引入Spring配置
public class BaseTest {

    @Resource
    TestService testService;

    @BeforeClass
    public static void testBeforeClass() {

        System.out.println("BeforeClass");
    }

    @Before
    public void testBefore() {

        System.out.println("Before");
    }

    @AfterClass
    public static void testAfterClass() {

        System.out.println("AfterClass");
    }

    @After
    public void testAfter() {

        System.out.println("After");
    }

    @Test
    public void test1() {

        Assert.assertEquals("666", 11, 11);
    }

    @Test
    public void test2() {

        Assert.assertEquals("666", 11, 11);
    }

    @Test
    //让测试运行于Spring环境
    public void testSpringMvc() {
        System.out.println("====" + testService.getTestById(1).toString());
        Assert.assertEquals("666", 11, 11);
    }

}
运行结果:

2019年2月14日 09:48:00
六.使用MockMvc测试Spring mvc Controller
概述
对模块进行集成测试时,希望能够通过输入URL对Controller进行测试,如果通过启动服务器,建立http client进行测试,这样会使得测试变得很麻烦,比如,启动速度慢,测试验证不方便,依赖网络环境等,这样会导致测试无法进行,为了可以对Controller进行测试,可以通过引入MockMVC进行解决。
简介
MockMvc实现了对Http请求的模拟,能够直接使用网络的形式,转换到Controller的调用,这样可以使得测试速度快、不依赖网络环境,而且提供了一套验证的工具,这样可以使得请求的验证统一而且很方便。
运行配置
用到的注解
- RunWith(SpringJUnit4ClassRunner.class): 表示使用Spring Test组件进行单元测试;
- WebAppConfiguration: 使用这个Annotate会在跑单元测试的时候真实的启一个web服务,然后开始调用Controller的Rest API,待单元测试跑完之后再将web服务停掉;
- ContextConfiguration: 指定Bean的配置文件信息,可以有多种方式,这个例子使用的是文件路径形式,如果有多个配置文件,可以将括号中的信息配置为一个字符串数组来表示;
基本框架
/**
 * 演示MockMVC使用
 * @author zhanyongzhi
 */
@RunWith(SpringJUnit4ClassRunner.class)
@ContextConfiguration("classpath*:**web-config.xml")
@WebAppConfiguration
public class MockMvcTest {
    private MockMvc mockMvc;

    @Autowired
    private WebApplicationContext webApplicationContext;

    @Before
    public void setUp() throws Exception {
        mockMvc = MockMvcBuilders.webAppContextSetup(webApplicationContext).build();
    }
}
测试逻辑
校验Controller处理之后,请求是否为成功状态,返回的内容是否包含了:"{'foo':'bar'}"字符串。
1 mockMvc调用perform,调用controller的业务处理逻辑
2 perform返回ResultActions,返回操作结果,通过ResultActions,提供了统一的验证方式。
3 使用StatusResultMatchers对请求结果进行验证
4 使用ContentResultMatchers对请求返回的内容进行验证
/**
 * 演示MockMVC使用
 * @author zhanyongzhi
 */
@RunWith(SpringJUnit4ClassRunner.class)
@ContextConfiguration("classpath*:**web-config.xml")
@WebAppConfiguration
public class MockMvcTest {
    private MockMvc mockMvc;

    @Autowired
    private WebApplicationContext webApplicationContext;

    @Before
    public void setUp() throws Exception {
        mockMvc = MockMvcBuilders.webAppContextSetup(webApplicationContext).build();
    }

    @Test
    public void demo() throws Exception {
        mockMvc.perform(get("/demo/test").accept(MediaType.parseMediaType("application/json;charset=UTF-8")))
               .andExpect(status().isOk())
               .andExpect(content().contentType("application/json;charset=UTF-8"))
               .andExpect(content().json("{'foo':'bar'}"));
    }
}
在 springboot中的使用
package com.my.study.test;

import org.junit.Before;
import org.junit.Test;
import org.junit.runner.RunWith;
import org.springframework.boot.test.context.SpringBootTest;
import org.springframework.http.MediaType;
import org.springframework.test.context.junit4.SpringRunner;
import org.springframework.test.web.servlet.MockMvc;
import org.springframework.test.web.servlet.request.MockMvcRequestBuilders;
import org.springframework.test.web.servlet.result.MockMvcResultHandlers;
import org.springframework.test.web.servlet.result.MockMvcResultMatchers;
import org.springframework.test.web.servlet.setup.MockMvcBuilders;

import com.my.study.controller.UserController;

@RunWith(SpringRunner.class)
@SpringBootTest
public class UserControllerTest {
    private MockMvc mvc;

    @Before
    public void Setup() throws Exception{
        mvc = MockMvcBuilders.standaloneSetup(new UserController()).build();
    }

    @Test
    public void getHello()  throws Exception{
        mvc.perform(MockMvcRequestBuilders.get("/user/test").accept(MediaType.APPLICATION_JSON))
        .andExpect(MockMvcResultMatchers.status().isOk())
        .andDo(MockMvcResultHandlers.print())
        .andReturn();

    }

}
参考
test mockmvc
integration testing
spring mvc unit test
2019年3月25日 08:00:29

