


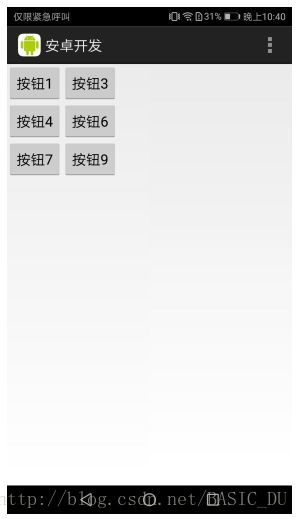
1、TableLayout(表格布局)的样式,就像是一张表格。每个TableLayout,都由多个TableRow组成,每个TableRow就是一行,有几个TableRow就有几行。TableLayout不会显示行号和列号,也没有分割线,其行数和列数都可以进行操作。
下面是 3 (行) x 3(列) 的TableLayout,其xml布局文件table_relative01.xml如下:
<?xml version="1.0" encoding="utf-8"?>
<TableLayout xmlns:android="http://schemas.android.com/apk/res/android"
    android:layout_width="match_parent"
    android:layout_height="match_parent">
    <TableRow >
        <Button
            android:id="@+id/button01"
            android:layout_width="wrap_content"
            android:layout_height="wrap_content"
            android:text="按钮1"
        ></Button>
        <Button
            android:id="@+id/button02"
            android:layout_width="wrap_content"
            android:layout_height="wrap_content"
            android:text="按钮2"
        ></Button>
        <Button
            android:id="@+id/button03"
            android:layout_width="wrap_content"
            android:layout_height="wrap_content"
            android:text="按钮3"
        ></Button>
    </TableRow>

    <TableRow >
        <Button
            android:id="@+id/button04"
            android:layout_width="wrap_content"
            android:layout_height="wrap_content"
            android:text="按钮4"
        ></Button>
        <Button
            android:id="@+id/button05"
            android:layout_width="wrap_content"
            android:layout_height="wrap_content"
            android:text="按钮5"
        ></Button>
        <Button
            android:id="@+id/button06"
            android:layout_width="wrap_content"
            android:layout_height="wrap_content"
            android:text="按钮6"
        ></Button>
    </TableRow>

    <TableRow >
        <Button
            android:id="@+id/button07"
            android:layout_width="wrap_content"
            android:layout_height="wrap_content"
            android:text="按钮7"
        ></Button>
        <Button
            android:id="@+id/button08"
            android:layout_width="wrap_content"
            android:layout_height="wrap_content"
            android:text="按钮8"
        ></Button>
        <Button
            android:id="@+id/button09"
            android:layout_width="wrap_content"
            android:layout_height="wrap_content"
            android:text="按钮9"
        ></Button>
    </TableRow>
</TableLayout>
实际效果图如下:
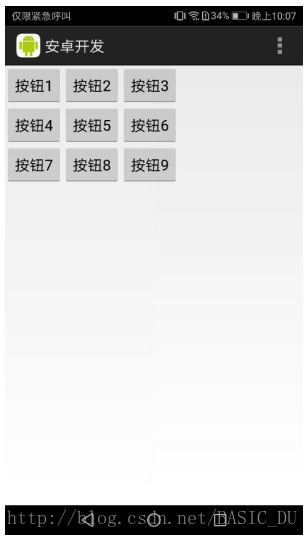
该布局xml文件,有三行,每一行有3个Button按钮,是3 x 3的TableLayout。
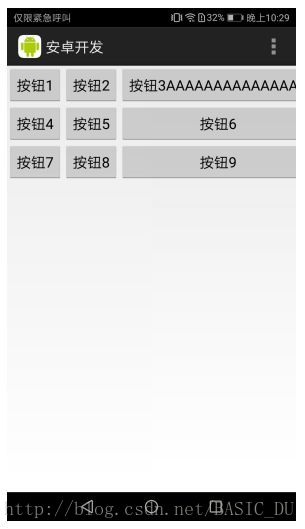
2、TableLayout的android:shrinkColumns属性,当TableRow里边的空间布满布局的时候,指定列自动延伸以填充可用部分。当TableRow里边的控件还没有布满布局时,android:shrinkColumns不起作用。
下面的布局文件table_relative02_1.xml,演示了android:shrinkColumns属性的使用:
<?xml version="1.0" encoding="utf-8"?>
<TableLayout xmlns:android="http://schemas.android.com/apk/res/android"
    android:layout_width="match_parent"
    android:layout_height="match_parent"
    android:shrinkColumns="2"
    >
    <TableRow >
        <Button
            android:id="@+id/button01"
            android:layout_width="wrap_content"
            android:layout_height="wrap_content"
            android:text="按钮1"
        ></Button>
       <!-- android:text="按钮1AAAAAAAAAAAAAAA" -->
        <Button
            android:id="@+id/button02"
            android:layout_width="wrap_content"
            android:layout_height="wrap_content"
            android:text="按钮2"
        ></Button>
        <!-- android:text="按钮2AAAAAAAAAAAAAAA" -->
        <Button
            android:id="@+id/button03"
            android:layout_width="wrap_content"
            android:layout_height="wrap_content"
            android:text="按钮3AAAAAAAAAAAAAAA"
        ></Button>
    </TableRow>

    <TableRow >
        <Button
            android:id="@+id/button04"
            android:layout_width="wrap_content"
            android:layout_height="wrap_content"
            android:text="按钮4"
        ></Button>
        <Button
            android:id="@+id/button05"
            android:layout_width="wrap_content"
            android:layout_height="wrap_content"
            android:text="按钮5"
        ></Button>
        <Button
            android:id="@+id/button06"
            android:layout_width="wrap_content"
            android:layout_height="wrap_content"
            android:text="按钮6"
        ></Button>
    </TableRow>

    <TableRow >
        <Button
            android:id="@+id/button07"
            android:layout_width="wrap_content"
            android:layout_height="wrap_content"
            android:text="按钮7"
        ></Button>
        <Button
            android:id="@+id/button08"
            android:layout_width="wrap_content"
            android:layout_height="wrap_content"
            android:text="按钮8"
        ></Button>
        <Button
            android:id="@+id/button09"
            android:layout_width="wrap_content"
            android:layout_height="wrap_content"
            android:text="按钮9"
        ></Button>
    </TableRow>
</TableLayout>
实际效果图如下:

从上面的实际效果图片可以看到,当TableLayout设置了android:shrinkColumns属性,则在TableRow中的控件如果超长的话,设置指定的列为可收缩的列。当可收缩的列太宽(内容过多)不会被挤出屏幕。当需要设置多列为可收缩时,将列序号用逗号隔开。
下面的布局文件table_relative02_2.xml,演示了没有设置android:shrinkColumns属性,则在TableRow中的控件超长,也不会自动延伸以填充可用部分。
<?xml version="1.0" encoding="utf-8"?>
<TableLayout xmlns:android="http://schemas.android.com/apk/res/android"
    android:layout_width="match_parent"
    android:layout_height="match_parent"
    >
    <TableRow >
        <Button
            android:id="@+id/button01"
            android:layout_width="wrap_content"
            android:layout_height="wrap_content"
            android:text="按钮1"
        ></Button>
       <!-- android:text="按钮1AAAAAAAAAAAAAAA" -->
        <Button
            android:id="@+id/button02"
            android:layout_width="wrap_content"
            android:layout_height="wrap_content"
            android:text="按钮2AAAAAAAAAAAAAAA"
        ></Button>
        <!-- android:text="按钮2" -->
        <Button
            android:id="@+id/button03"
            android:layout_width="wrap_content"
            android:layout_height="wrap_content"
            android:text="按钮3AAAAAAAAAAAAAAA"
        ></Button>
    </TableRow>

    <TableRow >
        <Button
            android:id="@+id/button04"
            android:layout_width="wrap_content"
            android:layout_height="wrap_content"
            android:text="按钮4"
        ></Button>
        <Button
            android:id="@+id/button05"
            android:layout_width="wrap_content"
            android:layout_height="wrap_content"
            android:text="按钮5"
        ></Button>
        <Button
            android:id="@+id/button06"
            android:layout_width="wrap_content"
            android:layout_height="wrap_content"
            android:text="按钮6"
        ></Button>
    </TableRow>

    <TableRow >
        <Button
            android:id="@+id/button07"
            android:layout_width="wrap_content"
            android:layout_height="wrap_content"
            android:text="按钮7"
        ></Button>
        <Button
            android:id="@+id/button08"
            android:layout_width="wrap_content"
            android:layout_height="wrap_content"
            android:text="按钮8"
        ></Button>
        <Button
            android:id="@+id/button09"
            android:layout_width="wrap_content"
            android:layout_height="wrap_content"
            android:text="按钮9"
        ></Button>
    </TableRow>
</TableLayout>
实际效果图如下:
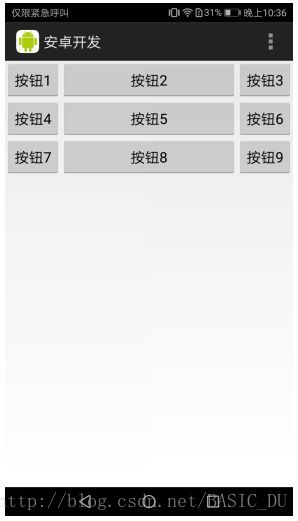
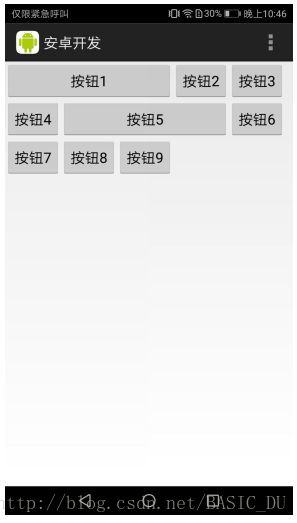
3-1、TableLayout的android:stretchColumns属性,用于指定列对空白部分进行填充。
下面的布局文件table_relative03_1.xml,演示了android:stretchColumns属性的使用:
<?xml version="1.0" encoding="utf-8"?>
<TableLayout xmlns:android="http://schemas.android.com/apk/res/android"
    android:layout_width="match_parent"
    android:layout_height="match_parent"
    android:stretchColumns="1"
    >
    <TableRow >
        <Button
            android:id="@+id/button01"
            android:layout_width="wrap_content"
            android:layout_height="wrap_content"
            android:text="按钮1"
        ></Button>
        <Button
            android:id="@+id/button02"
            android:layout_width="wrap_content"
            android:layout_height="wrap_content"
            android:text="按钮2"
        ></Button>
        <!-- android:text="按钮2" -->
        <Button
            android:id="@+id/button03"
            android:layout_width="wrap_content"
            android:layout_height="wrap_content"
            android:text="按钮3"
        ></Button>
    </TableRow>

    <TableRow >
        <Button
            android:id="@+id/button04"
            android:layout_width="wrap_content"
            android:layout_height="wrap_content"
            android:text="按钮4"
        ></Button>
        <Button
            android:id="@+id/button05"
            android:layout_width="wrap_content"
            android:layout_height="wrap_content"
            android:text="按钮5"
        ></Button>
        <Button
            android:id="@+id/button06"
            android:layout_width="wrap_content"
            android:layout_height="wrap_content"
            android:text="按钮6"
        ></Button>
    </TableRow>

    <TableRow >
        <Button
            android:id="@+id/button07"
            android:layout_width="wrap_content"
            android:layout_height="wrap_content"
            android:text="按钮7"
        ></Button>
        <Button
            android:id="@+id/button08"
            android:layout_width="wrap_content"
            android:layout_height="wrap_content"
            android:text="按钮8"
        ></Button>
        <Button
            android:id="@+id/button09"
            android:layout_width="wrap_content"
            android:layout_height="wrap_content"
            android:text="按钮9"
        ></Button>
    </TableRow>
</TableLayout>
实际效果图如下:
3-2、android:stretchColumns属性,若有多列需要设置为可伸展,请用逗号将需要伸展的列序号隔开。
下面的布局文件table_relative03_2.xml,演示了多行android:stretchColumns属性的使用:
<?xml version="1.0" encoding="utf-8"?>
<TableLayout xmlns:android="http://schemas.android.com/apk/res/android"
    android:layout_width="match_parent"
    android:layout_height="match_parent"
    android:stretchColumns="0,2"
    >
    <TableRow >
        <Button
            android:id="@+id/button01"
            android:layout_width="wrap_content"
            android:layout_height="wrap_content"
            android:text="按钮1"
        ></Button>
        <Button
            android:id="@+id/button02"
            android:layout_width="wrap_content"
            android:layout_height="wrap_content"
            android:text="按钮2"
        ></Button>
        <!-- android:text="按钮2" -->
        <Button
            android:id="@+id/button03"
            android:layout_width="wrap_content"
            android:layout_height="wrap_content"
            android:text="按钮3"
        ></Button>
    </TableRow>

    <TableRow >
        <Button
            android:id="@+id/button04"
            android:layout_width="wrap_content"
            android:layout_height="wrap_content"
            android:text="按钮4"
        ></Button>
        <Button
            android:id="@+id/button05"
            android:layout_width="wrap_content"
            android:layout_height="wrap_content"
            android:text="按钮5"
        ></Button>
        <Button
            android:id="@+id/button06"
            android:layout_width="wrap_content"
            android:layout_height="wrap_content"
            android:text="按钮6"
        ></Button>
    </TableRow>

    <TableRow >
        <Button
            android:id="@+id/button07"
            android:layout_width="wrap_content"
            android:layout_height="wrap_content"
            android:text="按钮7"
        ></Button>
        <Button
            android:id="@+id/button08"
            android:layout_width="wrap_content"
            android:layout_height="wrap_content"
            android:text="按钮8"
        ></Button>
        <Button
            android:id="@+id/button09"
            android:layout_width="wrap_content"
            android:layout_height="wrap_content"
            android:text="按钮9"
        ></Button>
    </TableRow>
</TableLayout>
实际效果图如下:
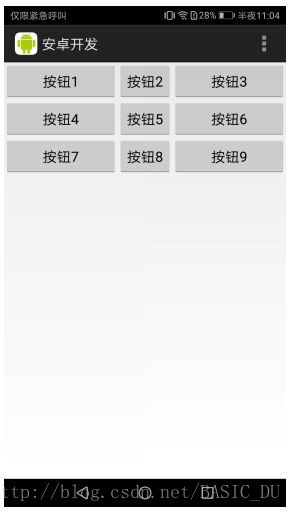
4、TableLayout的android:collapseColumns属性,用于隐藏指定的列,若有多列需要隐藏,请用逗号将需要隐藏的列序号隔开。。
下面的布局文件table_relative04.xml,演示了android:collapseColumns属性的使用:
<?xml version="1.0" encoding="utf-8"?>
<TableLayout xmlns:android="http://schemas.android.com/apk/res/android"
    android:layout_width="match_parent"
    android:layout_height="match_parent"
    android:collapseColumns="1"
    >
    <TableRow >
        <Button
            android:id="@+id/button01"
            android:layout_width="wrap_content"
            android:layout_height="wrap_content"
            android:text="按钮1"
        ></Button>
        <Button
            android:id="@+id/button02"
            android:layout_width="wrap_content"
            android:layout_height="wrap_content"
            android:text="按钮2"
        ></Button>
        <!-- android:text="按钮2" -->
        <Button
            android:id="@+id/button03"
            android:layout_width="wrap_content"
            android:layout_height="wrap_content"
            android:text="按钮3"
        ></Button>
    </TableRow>

    <TableRow >
        <Button
            android:id="@+id/button04"
            android:layout_width="wrap_content"
            android:layout_height="wrap_content"
            android:text="按钮4"
        ></Button>
        <Button
            android:id="@+id/button05"
            android:layout_width="wrap_content"
            android:layout_height="wrap_content"
            android:text="按钮5"
        ></Button>
        <Button
            android:id="@+id/button06"
            android:layout_width="wrap_content"
            android:layout_height="wrap_content"
            android:text="按钮6"
        ></Button>
    </TableRow>

    <TableRow >
        <Button
            android:id="@+id/button07"
            android:layout_width="wrap_content"
            android:layout_height="wrap_content"
            android:text="按钮7"
        ></Button>
        <Button
            android:id="@+id/button08"
            android:layout_width="wrap_content"
            android:layout_height="wrap_content"
            android:text="按钮8"
        ></Button>
        <Button
            android:id="@+id/button09"
            android:layout_width="wrap_content"
            android:layout_height="wrap_content"
            android:text="按钮9"
        ></Button>
    </TableRow>
</TableLayout>
实际效果图如下:
5、TableLayout的android:layout_span属性,设置组件显示所占用的列数。
下面的布局文件table_relative05.xml,演示了android:layout_span*属性的使用:
<?xml version="1.0" encoding="utf-8"?>
<TableLayout xmlns:android="http://schemas.android.com/apk/res/android"
    android:layout_width="match_parent"
    android:layout_height="match_parent"
    >
    <TableRow >
        <Button
            android:id="@+id/button01"
            android:layout_width="wrap_content"
            android:layout_height="wrap_content"
            android:layout_span="3"
            android:text="按钮1"
        ></Button>
        <Button
            android:id="@+id/button02"
            android:layout_width="wrap_content"
            android:layout_height="wrap_content"
            android:text="按钮2"
        ></Button>
        <!-- android:text="按钮2" -->
        <Button
            android:id="@+id/button03"
            android:layout_width="wrap_content"
            android:layout_height="wrap_content"
            android:text="按钮3"
        ></Button>
    </TableRow>

    <TableRow >
        <Button
            android:id="@+id/button04"
            android:layout_width="wrap_content"
            android:layout_height="wrap_content"
            android:text="按钮4"
        ></Button>
        <Button
            android:id="@+id/button05"
            android:layout_width="wrap_content"
            android:layout_height="wrap_content"
            android:layout_span="3"
            android:text="按钮5"
        ></Button>
        <Button
            android:id="@+id/button06"
            android:layout_width="wrap_content"
            android:layout_height="wrap_content"
            android:text="按钮6"
        ></Button>
    </TableRow>

    <TableRow >
        <Button
            android:id="@+id/button07"
            android:layout_width="wrap_content"
            android:layout_height="wrap_content"
            android:text="按钮7"
        ></Button>
        <Button
            android:id="@+id/button08"
            android:layout_width="wrap_content"
            android:layout_height="wrap_content"
            android:text="按钮8"
        ></Button>
        <Button
            android:id="@+id/button09"
            android:layout_width="wrap_content"
            android:layout_height="wrap_content"
            android:text="按钮9"
        ></Button>
    </TableRow>
</TableLayout>
实际效果图如下:
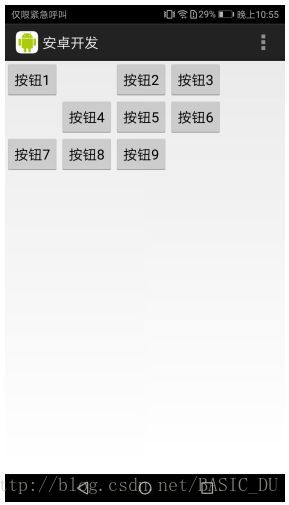
6、TableLayout的android:layout_column属性,设置组件所在列数。
下面的布局文件table_relative06.xml,显示了android:layout_column属性的使用:
<?xml version="1.0" encoding="utf-8"?>
<TableLayout xmlns:android="http://schemas.android.com/apk/res/android"
    android:layout_width="match_parent"
    android:layout_height="match_parent"
    >
    <TableRow >
        <Button
            android:id="@+id/button01"
            android:layout_width="wrap_content"
            android:layout_height="wrap_content"
            android:text="按钮1"
        ></Button>
        <Button
            android:id="@+id/button02"
            android:layout_width="wrap_content"
            android:layout_height="wrap_content"
            android:layout_column="2"
            android:text="按钮2"
        ></Button>
        <!-- android:text="按钮2" -->
        <Button
            android:id="@+id/button03"
            android:layout_width="wrap_content"
            android:layout_height="wrap_content"
            android:text="按钮3"
        ></Button>
    </TableRow>

    <TableRow >
        <Button
            android:id="@+id/button04"
            android:layout_width="wrap_content"
            android:layout_height="wrap_content"
            android:layout_column="1"
            android:text="按钮4"
        ></Button>
        <Button
            android:id="@+id/button05"
            android:layout_width="wrap_content"
            android:layout_height="wrap_content"
            android:text="按钮5"
        ></Button>
        <Button
            android:id="@+id/button06"
            android:layout_width="wrap_content"
            android:layout_height="wrap_content"
            android:text="按钮6"
        ></Button>
    </TableRow>

    <TableRow >
        <Button
            android:id="@+id/button07"
            android:layout_width="wrap_content"
            android:layout_height="wrap_content"
            android:text="按钮7"
        ></Button>
        <Button
            android:id="@+id/button08"
            android:layout_width="wrap_content"
            android:layout_height="wrap_content"
            android:text="按钮8"
        ></Button>
        <Button
            android:id="@+id/button09"
            android:layout_width="wrap_content"
            android:layout_height="wrap_content"
            android:text="按钮9"
        ></Button>
    </TableRow>
</TableLayout>
实际效果图如下:


 3826
3826


 被折叠的 条评论
为什么被折叠?
被折叠的 条评论
为什么被折叠?
 到【灌水乐园】发言


